Onboarding Jumpstart Guide - Manage Your Environment
Overview
As you begin to organize your new Automox account![]() The account acts as the main object to store and manage all of the organizations under the account, including specifying the enabled modules, features, billing settings, etc for each organization.
- Organization
- Users
- Privileges User / Role / Organization
- Billing & contact information
- Card details
- Payment mode and organizations, understanding what is available, and having access to best practices help you define your group
The account acts as the main object to store and manage all of the organizations under the account, including specifying the enabled modules, features, billing settings, etc for each organization.
- Organization
- Users
- Privileges User / Role / Organization
- Billing & contact information
- Card details
- Payment mode and organizations, understanding what is available, and having access to best practices help you define your group![]() Represents a concrete grouping of devices. Every device must be assigned to a single group. A group contains settings for the following:
- refresh interval
- OS auto-update structure and configure standards within the Automox console
Represents a concrete grouping of devices. Every device must be assigned to a single group. A group contains settings for the following:
- refresh interval
- OS auto-update structure and configure standards within the Automox console![]() Our web-based management dashboard, available at https://console.automox.com..
Our web-based management dashboard, available at https://console.automox.com..
Each company account has its own unique challenges, and there is no one-plan-fits-all solution. This guide provides you with resources and recommendations to help you define the best use of Automox for your company.
Automox Documentation
Automox has created content in several different formats. Here are the primary links to find that information and documentation:
- Automox Home: Automated Patch Management + Better Cyber Hygiene
- Automox Help Center: https://help.automox.com
- Product and Developer Documentation: https://docs.automox.com
- API: Automox API Reference
- Blog: The Automox Blog
- Webinars: Automox Webinars
- Quick Start Guide: Learn the Basics in Minutes
- Automox Community: Community for Automox users
- Release Feed: https://technicalreleasefeed.automox.com/
Console Overview
The console is your primary user interface to interact with Automox. You might have already explored the console during your trial and initial setup. Due to the intuitive and ease of use of the console's design, this section provides resources for additional information and detail rather than a detailed walkthrough.
Link to console
Dashboard
This is your landing page in the console. You can find an overview of your environment and links to actions that might interest you to manage your organization. Automox Console Dashboard
Devices
- Device Filter Panel: Search, sort, and filter devices. See Filtering and Searching on the Devices Page
- Device Details and Status. See Device Details
- Device queries: See Device Explorer
- What the Statuses Found in the Automox Console Mean
- Manage group placement, view/export inventory, scan/restart/remove devices. See Managing Devices
- Viewing Software Inventory
- Automox Compliance
Automate
This is where policies![]() Represents a set of logic statements that define the desired target state of a device, the allowed remediation schedule, and configuration parameters around how that remediation should take place., Worklet Catalog
Represents a set of logic statements that define the desired target state of a device, the allowed remediation schedule, and configuration parameters around how that remediation should take place., Worklet Catalog![]() Respository of pre-built, Automox-verified worklets, available in the Automox Console., and remediations are managed. (These topics are discussed again later in the document and/or document series.)
Respository of pre-built, Automox-verified worklets, available in the Automox Console., and remediations are managed. (These topics are discussed again later in the document and/or document series.)
Manage
This is where you manage groups, software, and manual approvals. (These topics are discussed again later in the document and/or document series.)
Insights
Under Insights, you can find Automox Analytics for pre-built risk and mitigation reporting.
Reports includes the following descriptions of reports and how to export data from the console:
Software
This section provides topics with tips and links related to the Software page.
Filtering and Searching
Exclusions/blocklist
- Some columns contain drill-down links or additional information when you click them. As an example, some items in the Severity column are blue. If you click on them, a related CVE number appears.
- If you click the blue number under the Impacted or Updated column, you see a list of devices that have available updates or have already applied that patch. You can export these lists.
Software Info
- Automox scans for software listed here in addition to a few unique paths for the third-party software supported by Automox (for example: Zoom, OneDrive)
- macOS
- /Applications/*.app
- /Applications/**/*.app
- /System/Applications/*.app
- /System/Applications/**/*.app
- Windows
- HKEY_LOCAL_MACHINE\Software\Microsoft\Windows\CurrentVersion\Uninstall\*
- HKEY_LOCAL_MACHINE\Software\wow6432node\Microsoft\Windows\CurrentVersion\Uninstall\*.
- Program Files
- Program Files (x86)
- Linux
- Query the package manager using the appropriate language for OS.
- dnf/yum
- Aptitude
- zypper
Settings
- Settings Overview
- Profile: Manage your user information, password, and notifications (email or Slack)
- Secrets & Keys - API: see Managing Organization Keys
- API key access rights are based on the account the key is created for. It allows the same rights as the user assigned role. You can limit the available actions an API key can make by generating a key for a user assigned the appropriate role. As an example, use a key generated for a read-only user to collect report details. This key does not allow the user to make changes in the environment.
- You can only create a new API key for yourself. You can manage API keys (enable, disable, or delete) if you are a Full Administrator or have a custom role with Organization: Read and Manage permissions.
- Security: Two-factor Authentication, Define Login Attempts, and SAML. See Multi-Organization SAML Single Sign-On.
In the console you can also click the ? to view resources such as our Help Center and Community.
|
System Requirements |
Windows
|
|---|---|
|
Environmental Considerations |
Local agent and log directories are useful for configuring antivirus rules. See Location of Files Required By Automox To ensure uninterrupted functionality, please consider if EPP (endpoint protection platform)/antivirus rules are required in your environment.
Copy
|
|
Agent Installation |
Where to find the agent: Download Links for the Latest Automox Installers
|
|
Agent: Various topics |
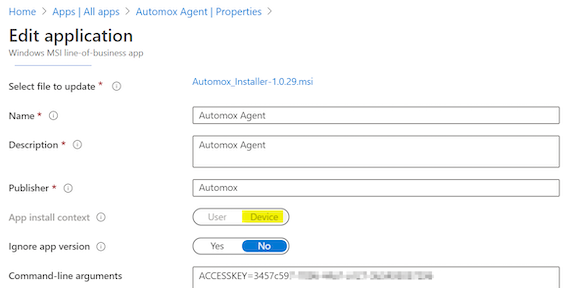
If you apply your image with a step-by-step or scripted process, consider disabling the Automox agent in your image and later enabling it in your deployment process when you are ready for Automox to become active.
|
|
Troubleshooting |
Agent Initialization:
Tips for troubleshooting agent installation:
|
Groups
You can arrange groups by department, geography, or whatever makes sense for your organization. You can use groups to efficiently manage patching, required software, and Worklet policies across your devices. You also use groups to define scan interval, and OS Patch Management configurations. Refer to the following:
- This is a prime opportunity for you to simplify your administration tasks by applying a functional group structure. Groups can be based on OS, Test/Production, or a business case such as organization administration or location and department.
- Parent groups are for organizational purposes ONLY.
- Policies are not inherited based on group hierarchy/structure. Policies must be directly assigned to each group where you want it to be applied.
- Use a predetermined naming convention for your groups and policies to get quick views of relevant objects. If you search for Worklet, Patch, or Required in the policies filter, it will filter to that type of policy.
- You can use the Windows PowerShell bulk installer script to automatically add devices to a specific group at agent installation time.
Scan
- Scans evaluate the status of your device and return hardware, software, and patch inventory. A scan returns the compliance state for Patch, Required Software, and Worklet policies assigned to the group. Scans also check if a restart is needed.
- Scan Interval
- You can set the scan interval per group from 6–24 hours (default is 24 hours).
- Groups - Best Practices
- Define your scan interval
- In most cases, setting the scan interval to 24 hours is ideal. This returns policy compliance and inventory 1 time per day.
- If you are onboarding and bringing your devices up to a current patch compliance state, you might want to shorten the scan interval temporarily for a current group-level compliance view.
- Automox best practice:
- Scan Interval - 24 hours*
* If you have a reason to shorten the time, then set this based on your needs.
- Scan Interval - 24 hours*
Set your OS Patch Management Settings
The OS Patch Management settings are key in controlling your patching process. Take a moment to consider these settings and configure them appropriately. This is one of the Automox configurations that may help shape your group structure. See OS Patch Management Settings for Groups.
Automox Best Practice
- Windows and macOS Patch Management - Disable OS automatic updates
This option prevents the device from automatically installing updates outside of your defined patch policies. Your patch policy defines when the device will pull updates from Microsoft Updates (or WSUS) and what patches to install. - Windows Update Source - Windows Update - or - WSUS
- If the devices in this group do not download content from a local WSUS server, set this to Windows Update.
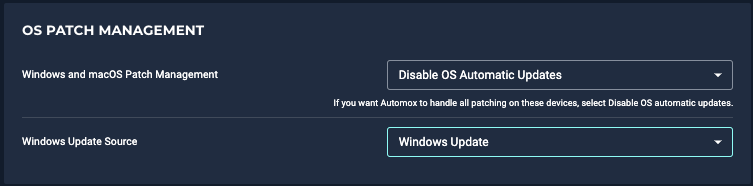
- If the devices in this group leverage a local WSUS server, set this to WSUS and enter your WSUS server address (for example, http://myserver.com:8530).

Manage non-Automox patch configurations
GPOs - Remove settings or set to "Not Configured"
- Behavior:
- Automox applies OS Patch Management settings when a scan runs.
- GPOs apply based on the policy refresh settings (default every 90 minutes).
- If they are set differently, your device WU agent might toggle patch source and potentially download content at unexpected times.
- Allow Automox to manage the WU settings when you are managing patching through Automox.
Default Group
- Automox assigns all new devices to the Default group. Defining the settings and policies targeting the Default group can add to your device management strategy. Here are a few concepts for the Default group configuration.
Scenario 1 - Soft Landing
- Intent - Get the agent installed, but don't enforce any changes until the device is moved to its proper management group.
- Suggested settings: OS Patch Management
- Windows and macOS Patch Management - Keep Device's Setting
- Windows Update Source - Keep Device's Setting
- Policy Assignment: None
- Outcome: When the agent initializes and the object is added to the Default group, the device settings remain unmanaged. The devices can then be moved into another group, which will define the patch setting and become managed based on the policies assigned to the new group.
Scenario 2 - Standardize
- Intent - Bring devices to a known standardized state as the devices are added to Automox management. This is ideal for a managed new computer setup, but without a current user.
- Suggested settings: OS Patch Management
- Windows and macOS Patch Management - Disable OS automatic updates
- Windows Update Source - Windows Update (or alternatively WSUS with defined WSUS server address)
- Policy Assignment:
- Assign Patch policies with the Schedule → Select All checkbox selected, the missed patch window (If a device misses a configured patch time, it will patch the next time the device checks in.) checkbox selected, and Automatic Restart enabled.
- (Optional) Create multiple Patch policies as defined above and schedule every few hours.
- Assign Required Software and Worklet policies to install line of business applications and configure your device to bring your device to standard
- Assign Patch policies with the Schedule → Select All checkbox selected, the missed patch window (If a device misses a configured patch time, it will patch the next time the device checks in.) checkbox selected, and Automatic Restart enabled.
- Outcome: Device patch settings are configured for Automox management. Patch state is brought to current, and required configurations and software are installed when devices are added to the Automox environment.
Group Structure
Groups provide two primary functions and one major setting.
- They provide an organizational structure for your devices.
- They provide a way to organize policy assignments.
- The OS Patch Management Settings define your patch source.
- Automox is built with simplicity in mind. This should motivate you to build your group structure in a way that simplifies your administration when using Automox to manage your devices.
- Policies are not inherited through parent groups, although the policy assignment is per group. Use this to help determine your hierarchy.
- Groups are sorted alphabetically by hierarchy. A naming convention will help with organization.
Group Structure Examples
Scenario 1 - Simplified Group Structure
- This scenario is ideal for simplifying administrative tasks. You can place all OS versions in the same groups because only the proper policies apply. Here you can control your deployment times and verify deployments to pilot groups prior to production. The server groups demonstrate a way to separate your systems by a maintenance window based on your environmental needs.
Miscellaneous
- Documentation Release Notes
- Automox Status Board: Operational status board for Automox services
- RSS Feed: https://status.automox.us/history.rss
Important URLS (for firewall and routing rules)
Windows URLs (TCP/80-443)
http://microsoft.com
windowsupdate.com
nsatc.net
phicdn.net
http://windows.com
All Windows updates URLs
*.delivery.dsp.mp.microsoft.com.nsatc.net
*.dl.delivery.mp.microsoft.com*
*.wac.phicdn.net
*.windowsupdate.com*
*dsp.mp.microsoft.com
*dsp.mp.microsoft.com.nsatc.net
*emdl.ws.microsoft.com*
*geo-prod.do.dsp.mp.microsoft.com*
*prod.do.dsp.mp.microsoft.com*
*wac.phicdn.net*
*windowsupdate.com*
au.download.windowsupdate.com*
cs9.wac.phicdn.net download.windowsupdate.com*
fe2.update.microsoft.com*
fe3.*.mp.microsoft.com.*
fe3.delivery.dsp.mp.microsoft.com.nsatc.net
fe3.delivery.mp.microsoft.com*
fe3cr.delivery.mp.microsoft.com
fe2cr.update.microsoft.com
v10.events.data.microsoft.com
v20.events.data.microsoft.com
fe3.update.microsoft.com
geo-prod.do.dsp.mp.microsoft.com
sls.update.microsoft.com*
sls.update.microsoft.com*
slscr.update.microsoft.com
slscr.update.microsoft.com*
Tsfe.trafficshaping.dsp.mp.microsoft.com
sls.update.microsoft.com
fe2.update.microsoft.com
fe3.delivery.mp.microsoft.com
au.download.windowsupdate.com
sls.update.microsoft.com.nsatc.net
fe2.update.microsoft.com.nsatc.net
fe3.delivery.dsp.mp.microsoft.com.nsatc.net
audownload.windowsupdate.nsatc.net
Delivery Optimization (DO) URLs for Split-Tunneling VPN
Delivery Optimization for Windows 10 updates - Windows Deployment
From this Microsoft solutions content, you can find further relevant URLs under the following sections:
- Delivery Optimization service endpoint:
- https://*.prod.do.dsp.mp.microsoft.com
- Delivery Optimization metadata:
- http://emdl.ws.microsoft.com
- http://*.dl.delivery.mp.microsoft.com
- Windows Update and Microsoft Store backend services and Windows Update and Microsoft Store payloads:
- http://*.windowsupdate.com
- https://*.delivery.mp.microsoft.com
- https://*.update.microsoft.com
