User Accounts
Learn about managing all aspects of user accounts including managing two-factor authentication.
This does not include global access management. For details about managing users and their organizations assignments from the Setup and Configuration page, see Understanding Global Access Management.
Accessing the User Accounts page
To access User Accounts, open the Settings menu in the upper-right corner of the console. Click Users.
The following options are available:
- Add users to the organization and define their permissions.
- View details about a user account.
- Export a CSV file containing details about the chosen users.
- Remove existing users from an organization.
- Manage two-factor authentication settings for users. Note: If SSO is enabled, this option is not available.
Adding a User Account
You can add a new user from the User Accounts page.
- Click Add User.
- In the Add User window, enter the email address for the new user.
- Select a role for the new user. Both default and custom roles appear in the list of available roles.
Note: Full administrators or global roles assigned from here only have permissions within this organization. - Click Send Invitation.
- A user who is new to the account receives an email invitation from Automox support that includes a link to create the account.
- An existing user to the account does not receive an email.
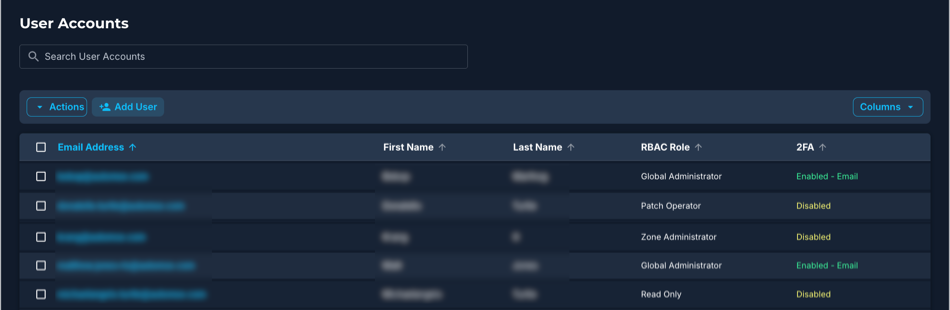
Viewing User Accounts
The following information is available from the User Accounts page. The columns are not necessarily all shown by default. The columns are sortable.
- Email address
- First name
- Last name
- RBAC role
- 2FA
- Status
- User ID (hidden by default)
Showing All Columns of Data
The default setting of the User Accounts table does not show all available columns. You can show more data or rearrange how the columns are presented.
- Click the Columns button and select the checkboxes to show or hide columns.
- You can rearrange the order of the data by dragging the columns to the desired position.
Viewing Details for a User Account
You can view user account information for each user and modify the user role.
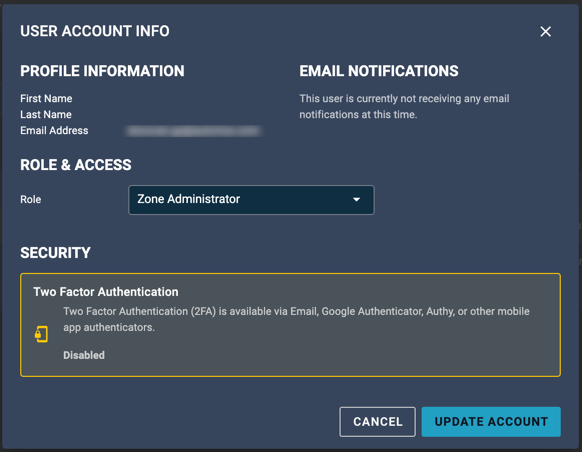
- From the User Accounts page, click the email address of the user you want to view account information for.
- In the dialog window, you can view information such as user name, email address, status, notification details. From here you can modify the role assignment.
- Under Roles, you can assign a new user role from the Assign Organization Roles drop-down menu. These roles are only associated with the organization you are currently in.
Note: You cannot add or remove Account or Global level roles from here. Use the Setup & Configuration page to edit these roles.
- Click the x next to the role name to remove any roles from the list. Updates are immediate.
Note: You can remove a user from all roles. The user is then directed to a notification page alerting them to this. They will then need to contact their administrator to be assigned a new role. - Click Update Account to save any changes.
Viewing Actions
Click the Actions button to select from the following options. The following sections describe them.
- Export User
- Remove Users
- Reset 2FA
Exporting User Account Details
You can export a CSV list of account details for a user or multiple users in your organization.
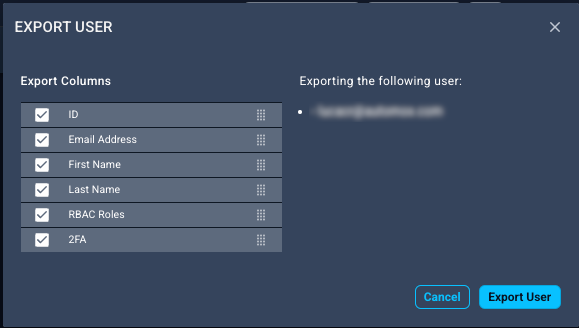
- From the User Accounts page, select the users you want to export information for.
- Click Actions → Export User.
- In the Export Users dialog box, select the data to export or clear the checkbox to not include that information. The following data can be exported:
- ID
- Email Address
- First Name
- Last Name
- RBAC Role
- 2FA
- Click Export User. This action downloads a CSV file with the information you have selected.
Removing a User Account
You can remove a user from your organization.
- From the User Accounts page, select the checkbox for the user you want to remove.
- Click Actions → Remove User.
- In the Remove User window, click Remove to confirm.
Resetting Two-factor Authentication (2FA)
You can reset two-factor authentication for a user or multiple users. This could be necessary in the case that 2FA for mobile was enabled and the mobile device used for verification was lost.
Resetting 2FA for a user defaults them to verification through email. See Security for more information.
- From the User Accounts page, select the checkbox for the users you want to reset 2FA for.
- Click Actions → Reset 2FA.
- Click Reset User.
