Managing Organizations
You can manage organizations![]() A subset of an account. An Automox customer account can be tied to multiple organizations, and users can be invited to, and access multiple organizations. An organization contains users, devices, and policies. from the Setup and Configuration page. To access this page, select the Global View
A subset of an account. An Automox customer account can be tied to multiple organizations, and users can be invited to, and access multiple organizations. An organization contains users, devices, and policies. from the Setup and Configuration page. To access this page, select the Global View![]() Centralized interface for managing multiple organizations under a single account. (Manage Orgs and Users) button at the top right of the Automox console.
Centralized interface for managing multiple organizations under a single account. (Manage Orgs and Users) button at the top right of the Automox console.
- You are an Account Administrator
 Account-level role managing billing, users, and organizations or Full Administrator or you have Organization: Manage permissions. See Roles and Permissions Management.
 - Only Account Administrators or custom roles with account-level based Organization: Create permissions can create organizations.
An organization is a collection of the devices![]() A subset of Assets, a general term denoting anything that runs the Automox Agent and is registered with the system. of a company’s IT infrastructure. Users
A subset of Assets, a general term denoting anything that runs the Automox Agent and is registered with the system. of a company’s IT infrastructure. Users![]() Represents a set of login credentials and contact information for an external user. A user is associated with an account. Once created a user should get privileges granted to act:
- at an account level
- at an organization level can be given a role
Represents a set of login credentials and contact information for an external user. A user is associated with an account. Once created a user should get privileges granted to act:
- at an account level
- at an organization level can be given a role![]() A named descriptor of default or custom permissions/access that can be associated with a user for interaction with the platform within or across organizations. to access an organization with certain permissions. These permissions are then only related to the devices in that organization. A user can therefore be assigned different permissions for different organizations. (See Roles and Permissions Management.)
A named descriptor of default or custom permissions/access that can be associated with a user for interaction with the platform within or across organizations. to access an organization with certain permissions. These permissions are then only related to the devices in that organization. A user can therefore be assigned different permissions for different organizations. (See Roles and Permissions Management.)
Viewing Organizations
The Organizations page shows all available organizations.
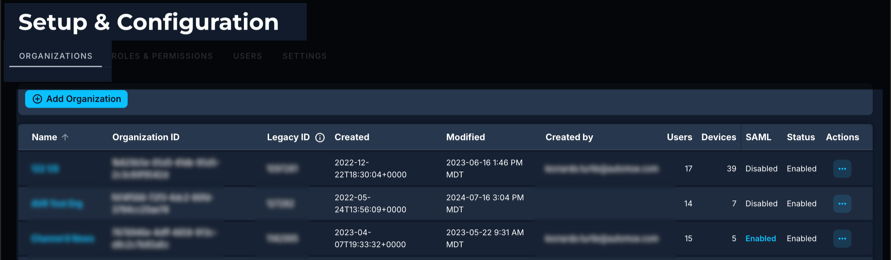
The following information is available from the Organizations table:
|
Organizations Table Column |
Description |
|---|---|
|
Name |
Name of the organization |
|
Organization UUID |
This is the universally unique identifier (UUID) associated with the organization |
|
Organization ID |
This lists the integer associated with the organization (org ID) |
|
Created |
Time and date that the organization was created |
|
Modified |
Time and date when the organization was updated or changed |
|
Created by |
Email address of the user who created the organization |
|
Users |
Number of users added to the organization |
|
Devices |
Number of devices added to the organization |
|
SAML |
Shows if SAML is enabled or disabled for the user |
| Status | Shows if this organization is enabled or disabled |
| Account UUID | This is the unique identifier for the Account. This column is hidden by default. |
| Global Organization UUID | This is the global-level Organization UUID. This column is hidden by default. |
|
Actions |
Edit Organization: You can modify the organization name and manage user roles assignments for this organization |
Adding Organizations
You can configure organizations based on the needs of your company’s IT structure.
Follow these steps to add an organization.
- From the Organizations page, click Add Organization.
- Enter a name for the organization and click Create Organization.
Account and global full administrators are automatically added to a new organization during the initial setup.
Note: The maximum name length is 45 characters. See Naming rules. - (Optional) To add users at the organization level only, go to Organizational Level Roles and select the email address from the Add User list. See also Managing Users.
- Select the role for the added user.
Note: Account and global full administrators are automatically added to a new organization during the initial setup. - Click Save.
Naming rules
- Maximum Length: The organization name must not exceed 45 characters.
- Allowed Characters:
- Letters: Uppercase and lowercase (A-Z, a-z)
- Digits: 0-9
- Special Characters: Underscore (_), hyphen (-), pipe (|), comma (,), apostrophe ('), and space
- Prohibited Characters: Any character or symbol not listed above is not allowed.
Editing Organizations
You can modify organizations from the Edit Organization page.
Follow these steps to edit an organization.
- Go to the Organizations page.
- You can access the Edit Organization page in two ways:
- Click the name of the organization you want to edit, or
- Go to the Actions menu (...) and click Edit Organization.
The Edit Organization page includes the following sections:
Details
This section provides an overview of the information listed on the main organization page, but for this one organization. You can find the following details about this organization:
- Account UUID, Global Organization UUID, Organization UUID, Organization ID, Creation Date, and number of users associated with this organization listed by role level.
- You can modify the organization name here.
Account Roles
This lists all account-level roles associated with this organization. To modify these, go to the Roles and Permissions tab.
Global Roles
This lists all global-level roles associated with this organization. To modify these, go to the Roles and Permissions tab.
Organization Level Roles
This lists all users and their assigned roles for this individual organization. From here you can take the following actions:
- Add a user and assign a corresponding role or roles
- Modify the role for an existing user
- Remove a user. (Click the x next to the user to remove them from this organization.)
- Confirm any modifications.
- When you remove a user from a specific organization, it does not remove the user from the company account.
- A user may be listed multiple times if they are assigned multiple roles within the same organization.
