Creating a Worklet
Use the Worklet Represents an automation script that can execute on a set of devices, consisting of evaluation and remediation code blocks. Worklets can be OS-specific or targeting a platform-agnostic language.™ option to perform any scriptable action on devices A subset of Assets, a general term denoting anything that runs the Automox Agent and is registered with the system., including disabling a vulnerable process, managing native OS controls, mass rollback of patches A software security or stability update., and moving unwanted applications. You can include variables to securely retrieve secrets. You can also configure restart notifications and deferral settings for worklets.
- Before you create a worklet from scratch, browse the Worklet Catalog Respository of pre-built, Automox-verified worklets, available in the Automox Console. for available and customizable worklets.
- To view the Worklet Catalog, your organization must be under a plan that includes Worklets. However, a subset of worklets are available to all users. These worklets are tagged as Base in the catalog.
Creating a Worklet
To create a worklet, follow these steps:
- From the main console, click Automate → Policies.
- Click Create Policy.
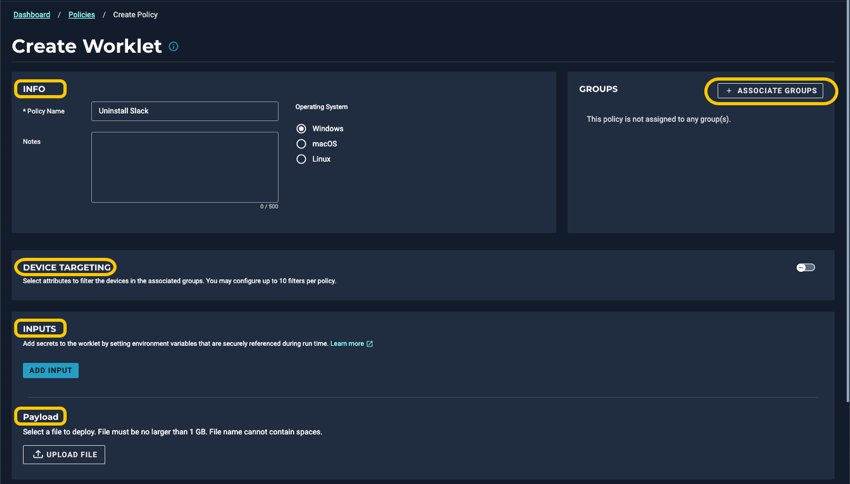
- From the Create Policy page, go to the Worklets section and select the corresponding OS for the policy you want to create.
Note: The worklet you create should be run on a device of the same OS. - In the Policy Info area, configure the following:
- Policy Name: Enter a name for the worklet. This field is required.
- Notes: Enter any notes, if required.
- (Optional) Set filters under Device Targeting, as needed. See Device Targeting with Filters for more information.
- (Optional) Configure Inputs. Use the Inputs section to add environment variables to the worklet code. See Secrets Management for more information.
- (Optional) Configure Payload. Select a file to deploy with the worklet.
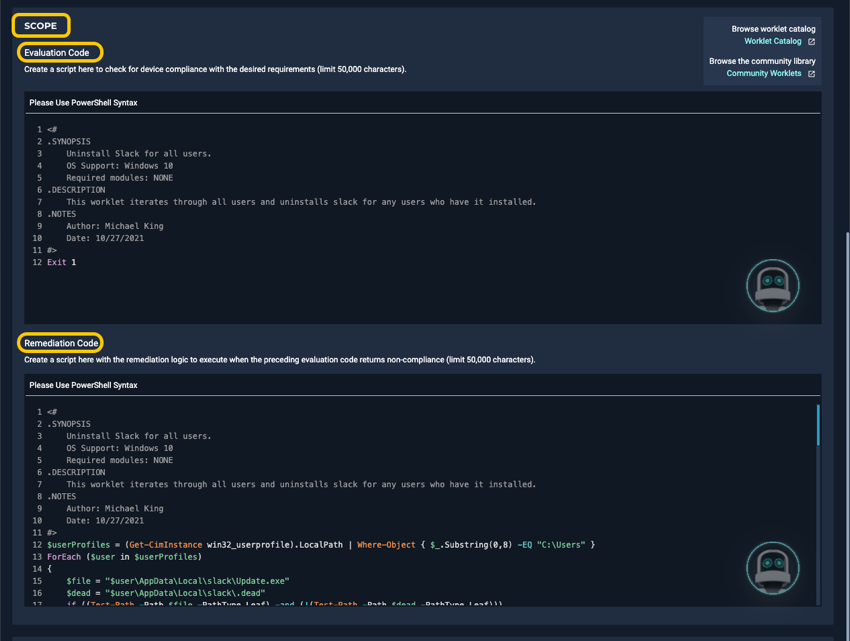
Note: The file size limit is 10 GB. - In the Scope section, enter a script for the worklet you are creating.
- Enter the evaluation and remediation code required for your worklet.
- Refer to How to Use Worklets. For example worklets, browse our Worklet Catalog for Automox verified worklets, or the Community Worklets library.
- Note: If you switch to a different OS, the code fields are automatically cleared.
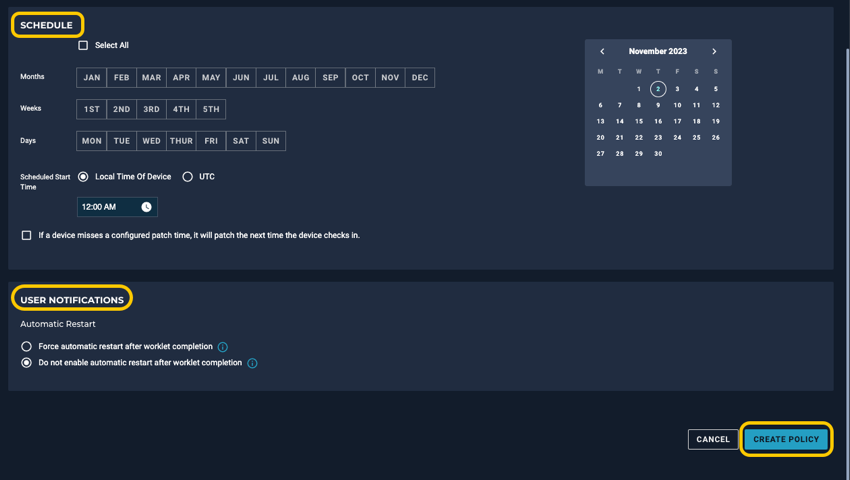
- In the Schedule area, set the patching schedule that will run on the device. The Schedule Preview provides a calendar view of the patching schedule. See Setting a Patching Schedule.
- After you set the schedule, you can configure Restart Notifications. Refer to End-User Notifications.
- Associate Groups to associate this policy with the desired group(s). When the policy is saved, the group is then assigned to the policy.
- Click Create Policy.
Disabling a Worklet
To disable a worklet, follow these steps:
- From the Policy page, click the worklet you want to disable.
- From the Edit Worklet page, go to Groups and remove any associated groups.
- Click Save Policy.
Browse the Worklet Catalog
The catalog of worklets allows you to immediately use a verified worklet for your purposes. You can also create a new policy based on an existing worklet. Refer to Using the Worklet Catalog for details.
For additional help, please submit a support request through the customer portal.
Related Topics
- Device Targeting with Filters
- Secrets Management
- Setting a Patching Schedule
- How to Use Worklets
- See our Community discussions around worklets.
- See Enabling and Using Ask Otto by Automox for details about using our script assistant
