Automox Agent Installation Overview
Before you can use the Automox Console![]() Our web-based management dashboard, available at https://console.automox.com. to manage devices
Our web-based management dashboard, available at https://console.automox.com. to manage devices![]() A subset of Assets, a general term denoting anything that runs the Automox Agent and is registered with the system. in your organization
A subset of Assets, a general term denoting anything that runs the Automox Agent and is registered with the system. in your organization![]() A subset of an account. An Automox customer account can be tied to multiple organizations, and users can be invited to, and access multiple organizations. An organization contains users, devices, and policies., you need to install the Automox Agent
A subset of an account. An Automox customer account can be tied to multiple organizations, and users can be invited to, and access multiple organizations. An organization contains users, devices, and policies., you need to install the Automox Agent![]() Lightweight client application, which is installed on managed devices.. This small-sized application runs in the background on each device. With this agent, your systems are kept up-to-date with all critical patches
Lightweight client application, which is installed on managed devices.. This small-sized application runs in the background on each device. With this agent, your systems are kept up-to-date with all critical patches![]() A software security or stability update..
A software security or stability update..
You can install the agent through an onboarding wizard, which uses unique identifiers to detect the devices that belong to your organization. After the agent is installed, you can set up an initial policy![]() Represents a set of logic statements that define the desired target state of a device, the allowed remediation schedule, and configuration parameters around how that remediation should take place. and schedule
Represents a set of logic statements that define the desired target state of a device, the allowed remediation schedule, and configuration parameters around how that remediation should take place. and schedule![]() The act of defining the date & time that a given policy would run. Ex: setting a Patch All policy to run every Monday morning at 5am, for the group(s) that the policy is assigned to.
Alternately, a plan for carrying out a process or procedure, giving lists of intended events and times.. With the first system completely setup, hardware and software inventory of your system is visible from the Devices page. You can continue adding devices right from the Dashboard
The act of defining the date & time that a given policy would run. Ex: setting a Patch All policy to run every Monday morning at 5am, for the group(s) that the policy is assigned to.
Alternately, a plan for carrying out a process or procedure, giving lists of intended events and times.. With the first system completely setup, hardware and software inventory of your system is visible from the Devices page. You can continue adding devices right from the Dashboard![]() The default landing page of the Automox Console that shows device/policy status overview. (see Related Topics).
The default landing page of the Automox Console that shows device/policy status overview. (see Related Topics).
Installing the Automox Agent
Before you can use the Automox Console to manage devices in your organization, you need to install the Automox Agent. See also Supported Operating Systems.
Prerequisites: You must have the required permissions to perform this action. See Roles and Permissions Management.You can use the onboarding wizard to install the agent. The installation steps depend on the operating system of the device you are installing to.
- To install on a Windows device, use the MSI installer method.
- To install on a macOS device, you can use either the installer method or the command line method.
- To install on Linux, use the command line method.
Using the MSI Installer Method to Download and Install the Automox Agent
You can use this method to install the agent on a Windows device.
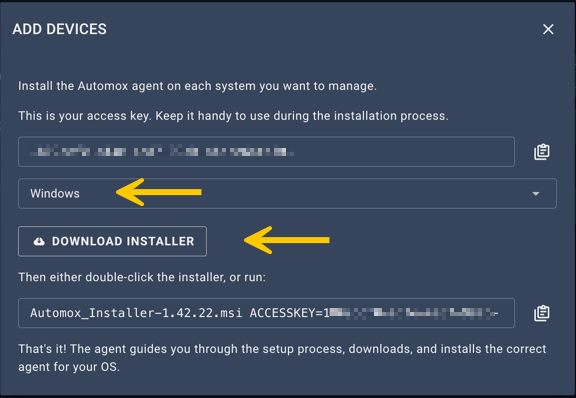
After you register for an account, click Add Devices.
- From the drop-down menu, select Windows.
- Click Download Installer. The MSI installer file is automatically downloaded to your device.
- Save the file to an appropriate location on your device.
- Copy the access key.
- Double-click on the MSI installer file and follow the steps of the installer. The console now scans for your device.
- You can now select the type of patching to apply or complete this step later.
Using the Installer Method to Download and Install the Automox Agent
You can use this method to install the agent on a macOS device.
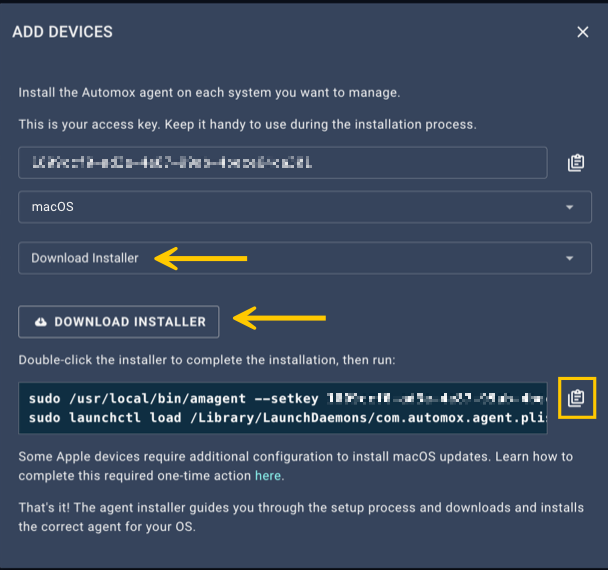
- After you register for an account, click Add Devices.
- From the drop-down menu, select macOS.
- From the install options, select Download Installer.
- Click Download Installer.
- Save the package.
- Copy the access key.
- Double-click the installer file and follow the steps of the installer.
- Agree with the software license agreement.
- Enter the access key and click Continue.
- Select the destination of the software.
- Click Install.
Using the Command Line Method to Download and Install the Automox Agent
You can use this method to install the Automox agent on a macOS or Linux device.
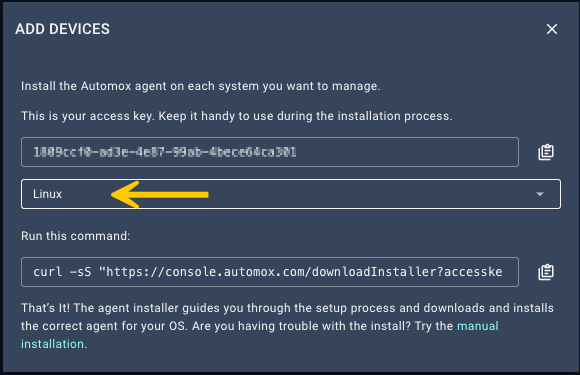
- After you register for an account, click Add Devices.
- From the drop-down menu, select macOS or Linux, depending on your device.
- For macOS, select from the install options Run Command.
- Copy the command line script and run it in a terminal to install the agent installer package
 Represents a piece of software for a specific OS family (Windows, Mac, Linux), OS version (Server 2019), CPU architecture (x86), and software version (v7.02.5329a)..
Setting an Initial Patching Schedule
You can set a schedule immediately after installing the Automox agent.
After you follow Installing the Automox Agent, you can schedule patching. The patching schedule determines when patching updates should be performed on the device.
From the create or edit policy page, follow these steps. For more information about policies, see Managing Policies.
- Ensure that the Policy Status is Active.
- From the Schedule area, click Select All to automatically preselect all months, weeks, and days.
- To fine tune the schedule, deselect any specific fields that do not apply to the schedule you want.
- In the Scheduled Start Time field, set the time that the update A minor version update to a patch or package, usually involving bugfixes and no major functionality changes. For example, updating a package from version 1.13 -> 1.14 should start. You can select either local time, so that each device is patched according to the time zone of their device or UTC. This means that all devices in the group Represents a concrete grouping of devices. Every device must be assigned to a single group. A group contains settings for the following:
- refresh interval
- OS auto-update are patched at the same universal time, regardless of time zone.
- Decide how you want the device to patch if a configured patch time is missed. By selecting the checkbox, the device will patch the next time it checks in.
- Verify the settings in the calendar preview pane.
- Click Create Policy or Save Policy to confirm.
