Automated Vulnerability Remediation Integration
Automated vulnerability remediation (AVR) brings together vulnerability detection and remediation. AVR shortens the vulnerability remediation cycles. AVR allows you to do the following:
- Automatically import prioritized vulnerabilities from InsightVM's Platform API into the Automox console
- Extend remediation actions through Worklets using Rapid7 vulnerability solution details
- Identify coverage gaps in managed devices between Rapid7's InsightVM API and the Automox console
- Remediate third-party vulnerabilities. Refer to Understanding Automox Severity Data for a list of software packages Automox can update.
Setting up for Rapid7 Integration
Follow these requirements and configuration steps to ensure the integration with Rapid7 is successful.
- You must have the required permissions for the organization where the devices are located.
- Your organization is under a plan that includes Automated Vulnerability Remediation.
Requirements
To use AVR, you need the following information:
- Your active Rapid7 license for InsightVM (Cloud Enabled)
- Your active Rapid7 Insight Platform API key
- Rapid7 Insight Platform region information
- You have an active Automox license that includes AVR
- Note: InsightConnect is not required
Accessing your Rapid7 API key
Before configuring a connection to Rapid7 InsightVM from within Automox, first collect the information needed to save a connection. This includes generating a Rapid7 Insight Platform API key and identifying the appropriate Rapid7 region. See also Rapid7 Api key documentation.
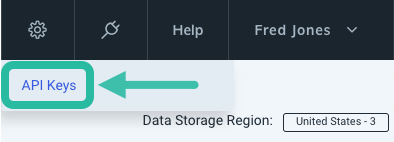
- Using an administrator account, login to the Rapid7 Insight Platform at https://insight.rapid7.com/platform#/
- After logging in, capture the region information (you need this later) and click the gear icon () to reveal the API Keys sub-menu. Click API Keys to continue.
- Click New User Key
- To generate a new user key, select an Organization from the drop-down menu and assign a Name to that organization.

- Click Generate.
- Copy the API key from the dialog window. You need this to configure the provider connection in a later step. When you are finished, click Done.

Creating a Connection and Configuration for the Rapid7 integration
To set up the automated vulnerability remediation integration with Rapid7, follow the steps described in this section:
- Creating a Connection to the Rapid7 Platform API
- Creating a Configuration, which defines Asset and Vulnerability scope
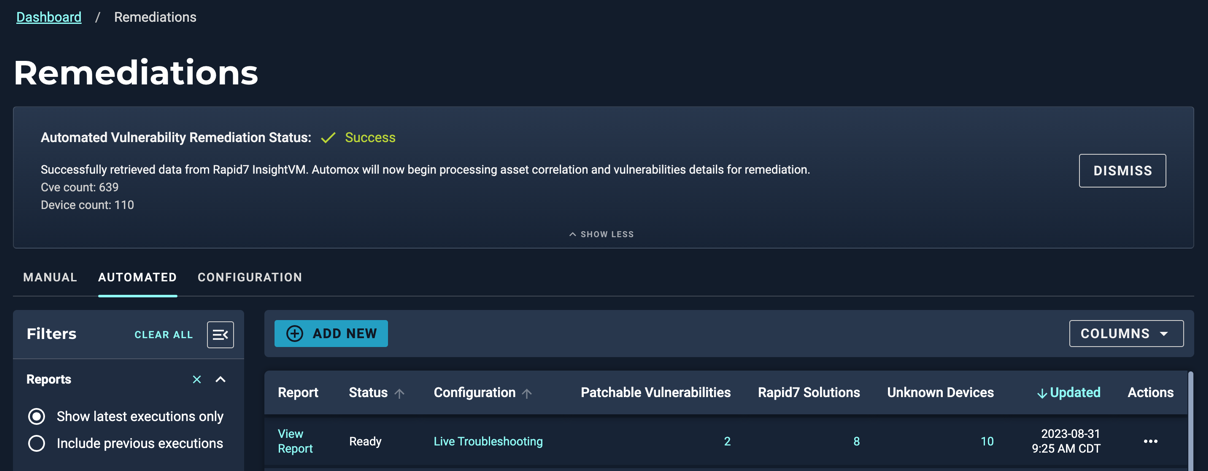
After you complete these steps, Automox pulls remediations on a recurring basis.
Creating a Connection
- From the Automox console, select Automate → Remediations.
- Note: If you are accessing the Remediations page for the first time, two boxes appear as shown here. Select the Get Started button in the Partner Integration: Rapid7 box and skip to Step 6 to configure the connection.

- The Remediations page opens to the Automated tab.
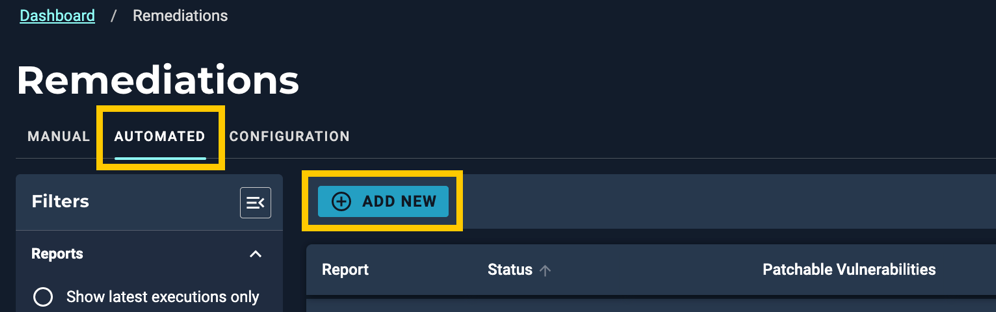
- Click Add New.
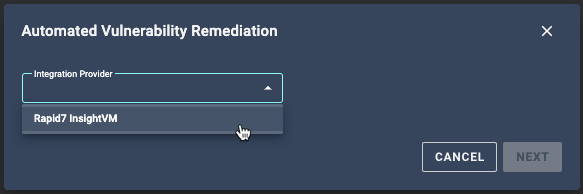
- From the Integration Provider drop-down menu, select Rapid7 InsightVM. Click Next.
- Follow these steps to configure the connection:
- Select Create a new connection. Make sure you have the required information ready.
- In the Connection Name field, enter a descriptive instance name. (For example, for customers with multiple organizations or regions: division01-us3 an division02-us2).
- Enter the Rapid7 API key.
- Select the region from the Rapid7 Region menu.
- Click Next.
- Because connections are reusable, you only need to perform these steps more than once if there are multiple Rapid7 organizations in the environment. If only a single connection is necessary, select the existing connection from the Connection drop-down menu.
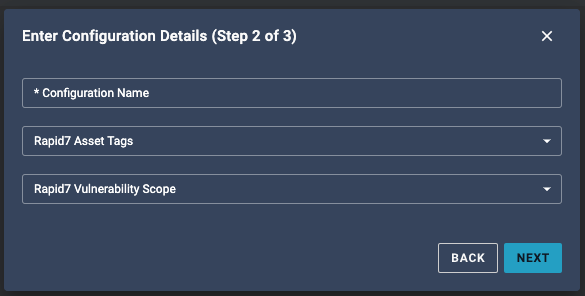
Creating a Configuration
After creating or selecting a connection, define the configuration settings.
For information about R7 Asset Tags, see Rapid7 Insight documentation.
- Enter a descriptive Configuration Name.
- Add any Rapid7 Asset Tags that you would like to scope from Rapid7. Hit enter or tab to define multiple tags.

- From the Rapid7 Vulnerability
 A flaw, weakness, or error in code, design, or configuration that can be exploited by threat actors to compromise the security, functionality, or data of an application or system. Scope drop-down list, select a scope from the options available:
- Exploitable Critical Vulnerabilities:Vulnerabilities with critical exploits available
- Common Exploitable Vulnerabilities: Commonly exploited vulnerabilities
- Vulnerabilities with 3+ Exploits: Vulnerabilities that have three or more exploits published
- CISA Recommended Vulnerabilities: Cybersecurity and Infrastructure Security Agency identified threats
- CVSS 0–10 scale for assessing vulnerability severity. Score > 8: (CVSSv3) Vulnerabilities that are greater than a severity score of 8
- Click Submit to complete the configuration. Automox saves the integration and immediately starts a pull of Rapid7 data.
Note: If you do not want to immediately fetch data, clear the checkbox for Fetch latest remediations The act of mitigating a vulnerability or a threat, or the neutralization or elimination of a vulnerability or the likelihood of its exploitation. now. - When the sync successfully finishes, the status is updated in the banner area of the Automox Console Our web-based management dashboard, available at https://console.automox.com..
You can now see the Automated tab and any reports. Refer to Remediation and Configuration Management for further details.
