ServiceNow Service Graph Connector for Automox
The Service Graph Connector for Automox is an application for the ServiceNow platform that provides configuration management database (CMDB) import capabilities for Automox device![]() A subset of Assets, a general term denoting anything that runs the Automox Agent and is registered with the system. data. For teams operating out of or collaborating with ServiceNow, importing Automox devices into ServiceNow can improve the accuracy of your CMDB. This enables improved decision making, asset
A subset of Assets, a general term denoting anything that runs the Automox Agent and is registered with the system. data. For teams operating out of or collaborating with ServiceNow, importing Automox devices into ServiceNow can improve the accuracy of your CMDB. This enables improved decision making, asset![]() An Asset is any device that can be, or is, running the Automox Agent and/or can be, or is, registered with the system. Also, device. tracking, incident management, and cross-functional collaboration.
An Asset is any device that can be, or is, running the Automox Agent and/or can be, or is, registered with the system. Also, device. tracking, incident management, and cross-functional collaboration.
The ServiceNow Store page for the app is here: Service Graph Connector for Automox
Imported Classes
The application imports data for multiple built-in CMDB CI classes, along with the custom Automox Device class.
Computers
Conditional checks against the OS Family and the OS Name define the CMDB class for computer records. The cmdb_ci_computer class is a fallback condition if there is no match for the OS Family and Name.
- Personal Computer (
cmdb_ci_pc_hardware) - Linux Server (
cmdb_ci_linux_server) - Windows Server (
cmdb_ci_windows_server) - Computer (
cmdb_ci_computer)
Fields
- Name
- If the Automox agent
 Lightweight client application, which is installed on managed devices. obtained the FQDN for the device, it is used in this field. Otherwise, the name value is the name in Automox.
- If the Automox agent
- Serial number
- Set to the system serial number
- Vendor
- RAM (MB)
- Manufacturer
- Model ID
- OS Version
- IP Address
- The IPv4 address of the primary network adapter
- Operating System Platform type for devices: Windows, macOS, or Linux.
- The operating system for the device including OS Family, Name, and Version
- CPU name
- MAC Address
- Network Adapter
- First connected network adapter for the system
- Used for CI lookup
- Serial Number
- Used for CI lookup
- System (if available)
- Used for CI lookup
- IP Addresses
- IPv4 and IPv6 addresses associated with the first NIC of the device
- First public IP address for the device
Network Adapters
The first connected network adapter for each device is imported and used for CI lookup.
- Network Adapter (
cmdb_ci_network_adapter)
Network Adapter Fields
- MAC Address
- Name
- Set to the network adapter device name (e.g., Network Adapter 1 or en0)
- IP Address
- Set to the primary IPv4 address of the network adapter
Serial Numbers
Serial numbers for the device are imported, including system serial number if it is available.
- Serial Number (
cmdb_serial_number)
Serial Number Fields
- Serial Number
- Serial Number Type
system
- Absent
- Valid
IP Addresses
The IPv4 and IPv6 addresses for the first connected network adapter of the device are imported, along with the first public IP address for the device.
- IP Address (
cmdb_ci_ip_address)
IP Address Fields
- Name
- IP Version
- IP Address
- Nic
- Reference to the primary device network adapter
- Owned by Configuration Item
- Reference to the device CI
Automox Device
Automox Device is a custom table included with the application that extends the Configuration Item (cmdb_ci) table. The table provides most of the device-specific fields available on an Automox device.
- Automox Device (
x_aut12_service_gr_automox_device)
Automox Device Fields
Installation
The installation section and the rest of this guide assume that your organization already has a ServiceNow instance. It is common to have sub-production and production instances. If your organization has both, you can test the application before deploying it in production by installing it on your sub-production instance.
Application Dependencies
The application requires the following ServiceNow plugins/applications for installation:
- ITOM Licensing (
com.snc.itom.license) - ITOM Discovery License (
com.snc.itom.discovery.license) - Contract Management (
com.snc.contract_management): 1.0.0 - Configuration Management (CMDB) (
com.snc.cmdb): 1.1 - CMDB CI Class Models (
sn_cmdb_ci_class): 1.30.0 - System Import Sets (
com.glide.system_import_set): 1.0.0 - Integration Commons for CMDB (
sn_cmdb_int_util): 2.6.3 - CMDB Workspace (
sn_cmdb_workspace): 1.0.0
Optionally, you can use the IntegrationHub ETL application to modify the default CMDB mappings.
Store Listing
The ServiceNow Store listing is here: Service Graph Connector for Automox.
Click the Get button on the listing to select which ServiceNow instances you want to allow access to the application.
Plugin Dependency Activation
Before you install the application, you must activate the ITOM Discovery License plugins in your instance. The rest of the dependencies are installed as part of the application installation.
To check whether these plugins are activated, follow these steps:
- Navigate to the System Plugins List.
- Type
sys_plugins.listinto the filter navigator and press enter. - Verify that ITOM Licensing and ITOM Discovery License are in the list.
Plugin Installation
To install the ITOM Licensing and ITOM Discovery License plugins if they are not already installed and active, follow the steps described here:
ITOM Licensing Installation
- Navigate to the ServiceNow Support portal: https://support.servicenow.com.
- In the menu, select Activate a Plugin. This option links to a separate support page.
- Select your target instance.
- For the plugin, enter
ITOM Licensing. - Set a time for activation from the scheduler and submit.
- To have the activation occur sooner, navigate back to the Support portal.
- Select My Open Changes.
- Select the Change case for the plugin installation.
- Update the schedule with a new date and time.
- Wait for confirmation of successful installation.
ITOM Discovery License Activation
- Navigate to the System Plugin State List. Note: This is different from the previous list.
- Type
v_plugin.listinto the filter navigator and press enter. - Filter the results by ID by entering the ITOM Discovery License plugin ID,
com.snc.itom.discovery.license. - Select the record.
- In the related links for the record, click Activate.
- Type
Application Installation
After installing and activating the plugin dependencies for the application, you can install the Service Graph Connector for Automox.
- Navigate to the All Applications list by using the filter navigator.
- Search for Service Graph Connector for Automox.
- Install the application.
- Refresh the browser window.
- You should now see the Service Graph Connector for Automox application menu in the filter navigator.
A background process during the installation executes the SG-Automox Discovery Source Fix Script that the application provides. This fix script installs the SG-Automox discovery source and registers the discovery source with ITOM Licensing.
Setup
With the application installed on your ServiceNow instance, you are ready to start the setup process. The Setup module includes a Guided Setup experience for setting up the entire application. Start by navigating to the Service Graph Connector for Automox > Setup module using the filter navigator. You should see a Guided Setup that looks similar to the following image:
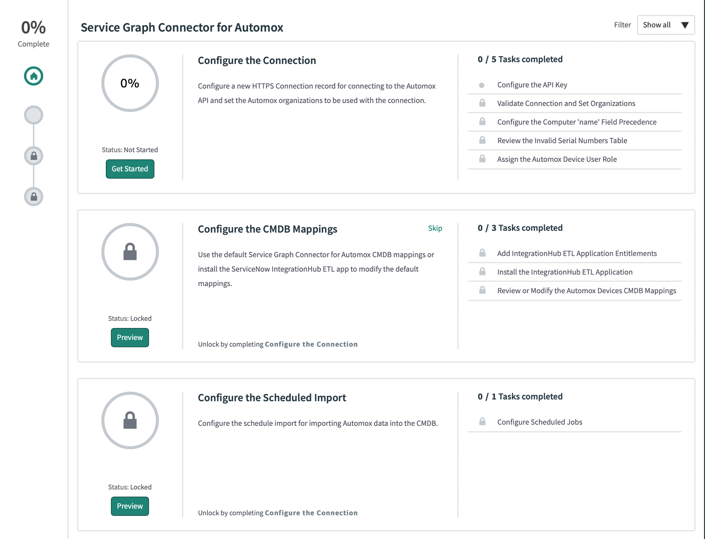
The guided setup is a sequential set of steps. Each step in the guided setup provides Embedded Help pages that are viewable via the Embedded Help panel. Note, the embedded help does not display when viewing the modules/pages directly. If you do not see the Embedded Help, click the help (?) icon in the menu bar in ServiceNow to display the help bar.
As you complete the guided setup, mark each step as completed to unlock subsequent steps. Some steps can be skipped and are labeled accordingly.
Configure the Connection
The Configure the Connection group includes steps to create a new HTTP(S) connection (http_connection) associated with the SG-Automox_Conn_Cred_Alias Connection and Credential Alias, validate the connection and configure its organizations, and assign the Automox devices read-only role that provides access to the Automox Device table.
Configure the API Key
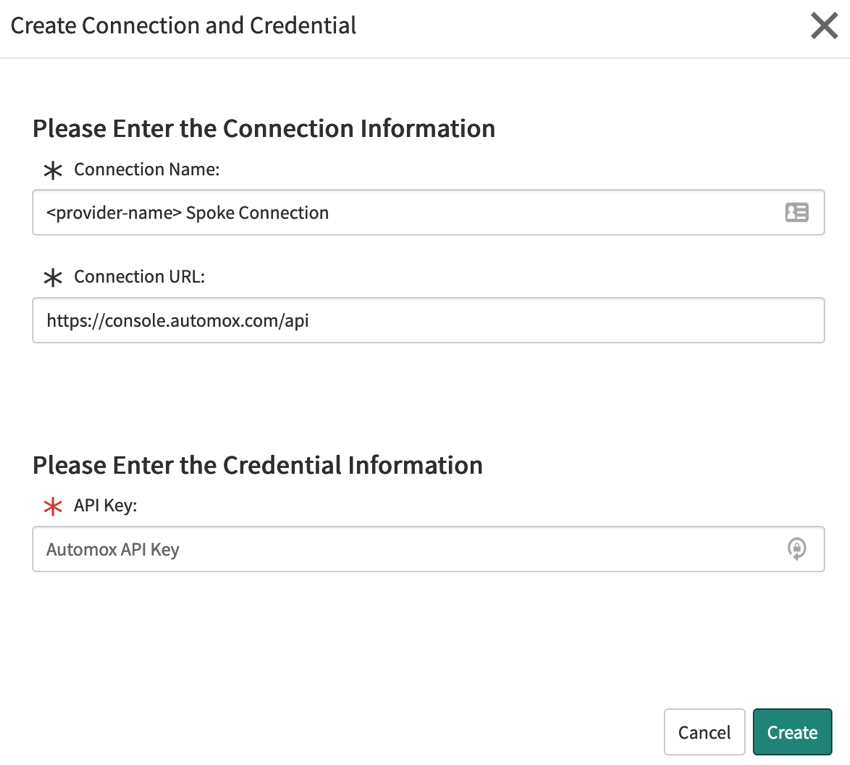
To use the application to query Automox for devices, you need an HTTP(S) connection and an Automox API key. Use a new API key instead of an existing one.
- In the Automox console, navigate to Settings > Keys to create a new key.
- Copy the key and navigate back to ServiceNow.
- Click the Create New Connection & Credential related link to create a new connection.
- Enter the name for the connection.
- Paste your new API key.
- Save the connection.
- Mark this step as complete.
To stage a connection; but not use it, mark it as inactive after creation.
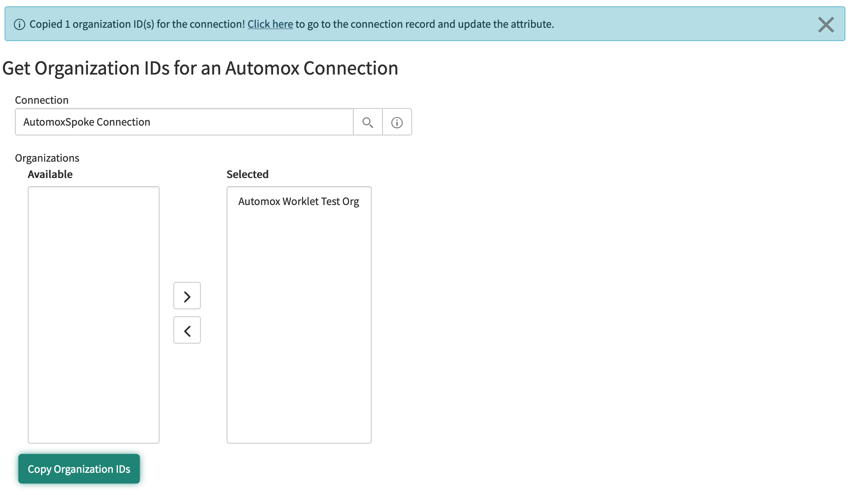
Validate Connection and Set Organizations
Follow these steps to validate that the application can access the Automox platform using the API key that was provided.
- Select a connection using the Connection reference field.
- You will see a message when the application attempts to retrieve the list of organizations for the connection.
- If you receive an error message or no organizations are returned, try pasting your API key in your connection once more.
- To import Automox devices into the CMDB, select the Automox organizations for those devices.
- Click the Copy Organization IDs button.
- A message is displayed confirming that the copy action was successful. In the message there is a link to the connection record.
- Select the Click here record link in the message window to navigate to the selected connection record.
- Paste the organization IDs into the Organization IDs field.
- Click the Update button to update the organizations associated with the connection.
- Mark this step as complete.
If you have more than one connection, you can set the organizations for the other connections before moving on to the next step.
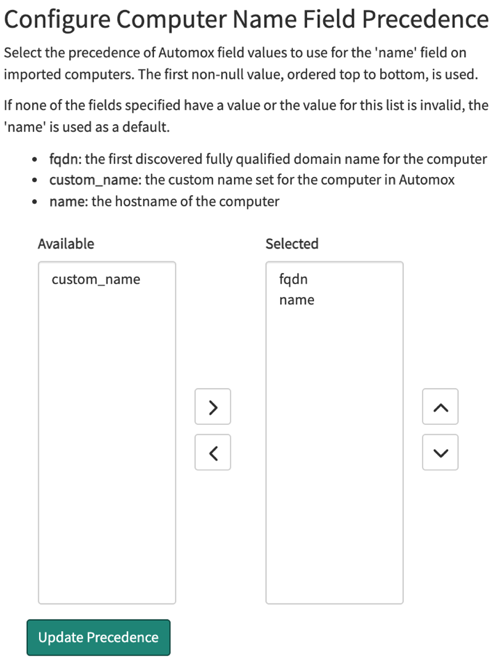
Configure the Computer "name" Field Precedence (Optional)
When importing devices from Automox, multiple values can be valid as the name for a device. The application allows you to customize the order of fields used with the first non-null value being used. By default, the name field on an imported configuration item (CI) is set to the fully qualified domain name (FQDN) if it was discovered by Automox or the hostname (name) if no FQDN was discovered. In addition, the custom name (custom_name) can be used to set the name of a CI to the custom name specified in Automox. This is useful for situations where there are hostname collisions across computers within Automox. Because custom names are not necessarily an accurate representation of the identity of a computer in an environment, this value is not used in the default precedence list.
The available options for the name field precedence list are:
- fqdn: the first discovered fully qualified domain name for the computer
- custom_name: the custom name set for the computer in Automox
- name: the hostname of the computer
If none of the fields specified have a value or the value for this list is invalid, the name is used as a default. The precedence list value is stored in the x_aut12_service_gr.computer_name_precedence System Property. The guided setup provides a link to the Configure Computer Name Field Precedence UI page that is included with the application to assist with setting the value of this property.
- Add the desired precedence fields to the column on the right.
- Order the fields from top to bottom.
- Click the Update Precedence button to update the precedence list value.
Review the Invalid Serial Numbers Table (Optional)
ServiceNow provides an Invalid Serial Numbers table (dscy_invalid_serial) that is used by the application during the import process to determine whether a serial number discovered by Automox is invalid. The Serial Number value is checked against the Invalid Serial Numbers table. When one of the rules specified in this table matches a serial number for a computer, it is marked as invalid. Marking the serial number as invalid ensures that it will not be used for lookup in the IRE during the import process, which prevents the creation of invalid serial numbers and prevents incorrect correlation of multiple devices that share this serial number value.
Examples of invalid serial numbers are the 0 and Unknown values. These values can be set by the Automox agent if it was unable to discover the serial number for a computer. As such, it is important to include these values in the Invalid Serial Numbers table, along with other known common values within your environment. ServiceNow includes a record for the Unknown value, and the application includes an additional record for the 0 value. However, it can still be important to review a sample set of the computers in your environment within the Automox console to identify additional rules that should be added to this table.
- Navigate to the Devices menu in the Automox console.
- Review the Device Details page for a selection of devices, taking note of any serial number values that are invalid.
- Navigate to the Invalid Serial Numbers table in ServiceNow using the Configure button for this step in the Guided Setup.
- Add a new record to the table by clicking the New button.
- Select the matching rule and enter the value for the invalid serial number.
- Click Submit.
- Repeat steps four through six if you have additional invalid serial number values to add.
The application uses the Cleanse Serial Number transform that is included with the Integration Commons for CMDB plugin to check the imported values against this table.
Assign the Automox Device User Role (Optional)
By default, only users with the admin role have access to Automox Device details in the Automox Device table and CI related lists. The application includes the x_aut12_service_gr.automox_device_user role that provides read-only access to the Automox Devices table. This role can be added to an existing role, for instance, the cmdb_read role, to grant all users with that role access to the table.
- Search for the role to which you would like to add the
x_aut12_service_gr.automox_device_userrole. - Select the role and click Edit... in the Contains Roles related list.
- Select the
x_aut12_service_gr.automox_device_userrole and save the form. - Mark this step as complete.
If you do not want to provide access to Automox Device details at this time, you can always come back to this step.
Configure the CMDB Mappings (Optional)
The Configure the CMDB Mappings group in the guided setup is an optional step group for installing the IntegrationHub ETL application and reviewing/modifying the default CMDB mappings.
Additional information on the IntegrationHub ETL application is available here: Product Documentation ServiceNow
Add IntegrationHub ETL Application Entitlements
This step links to the ServiceNow store to add instance entitlements for the IntegrationHub ETL application. The ETL application provides a guided experience for viewing, modifying, and testing the Robust Transform Maps included with the Service Graph Connector for Automox.
After adding the application entitlements, mark this step as complete.
Install the IntegrationHub ETL Application
Click the Configure button for this step to navigate to the application list with a filter for IntegrationHub ETL.
- Install the IntegrationHub ETL application.
- Mark this step as complete.
Review or Modify the Automox Devices CMDB Mappings
This step navigates to the CMDB Integration Studio module that the IntegrationHub ETL application provides. The Integration Studio provides an interface for viewing, modifying, and testing the default mappings for the SG-Automox Devices data source. It has a similar flow to the guided setup, with later steps locked pending completion of dependent steps.
- Click the Provide Basic Information for the ETL Transform Map step and mark it as complete.
- This step will run an import for testing the included mappings.
- Mark the Preview and Prepare Data step as completed.
- The transformations in this step are adjustable; however, the usage of these transformations in the Select CMDB Classes to Map Source Data should first be reviewed.
- Click the Select CMDB Classes to Map Source Data step to view the classes mapped by the application. Click an individual CMDB class to view the field mappings for this class. If the import in step 1 was successful, you should see example data on the right side of the page when viewing the mappings for a specific class.
- Complete this step after reviewing/editing the mappings.
- Review the relationships created in the Add Relationships step and mark the step as complete.
- Finally, click the Test and Rollback Integration Results and then Run Integration to test the mappings and view the CMDB import results.
- These changes can be rolled back when marking this step as complete or when clicking the back button on the page.
Configure the Import Schedule
The final guided step group links to the default import schedule that imports Automox devices through the SG-Automox Devices data source. This schedule runs daily upon activation and provides pre-checks to ensure that two import jobs do not run simultaneously.
Configure Scheduled Jobs
The Configure Scheduled Jobs guided setup step links to the default import schedule provided by the application. This file is a part of the application scope, so it is necessary to switch to the application scope to edit it. Copying the schedule provides the default configuration in a new import job while retaining the original default record for later use or reference.
Start by clicking the Configure button for the step.
Copying the Included Schedule
To copy the included import schedule, right-click the form head and select Insert. The insert action creates a copy of the import schedule in the current scope. ServiceNow will automatically navigate back to the guided setup page. Follow the steps below to find and activate the new import schedule.
- Navigate to the Scheduled Data Import list by entering
scheduled_data_import.listinto the filter navigator. - Search for the new record.
- A filter on the Application scope and name can help if there are many records.
- Click the record
- Modify the schedule if desired. Daily import is our recommendation.
- Clear the Run As field.
- Click Active to activate the schedule.
- Click Update.
Modifying the Included Schedule
To modify the included import schedule, follow the steps below.
- Click the link in the message at the top of the form that states, This record is in the Service Graph Connector for Automox application, but Global is the current application. To edit this record click here.
- Modify the schedule if desired. Daily import is our recommendation.
- Ensure that the Run As field is blank.
- Click Active to activate the schedule.
- Click Update.
Application Modules
The Service Graph Connector for Automox application menu provides application modules for reviewing the state of the integration and configuring it outside of the Guided Setup.
- Setup
- The Guided Setup for the Application
- Integration Dashboard
- A dashboard for reviewing the results of CMDB Application executions
- Data Sources
- A list of data sources included with the application
- Import Schedules
- A list of import schedules that utilize the included Data Sources
- Automox Devices
- A list view of the Automox Device (
x_aut12_service_gr_automox_device) table
- A list view of the Automox Device (
- Support
- Contains support details for the application
- Configuration
- Menu section containing application configuration related modules
- Configuration → Connections
- A list of HTTP(S) Connection (
http_connection) records associated with the includedx_aut12_service_gr.SG_Automox_Conn_Cred_AliasConnection and Credential Alias
- A list of HTTP(S) Connection (
- Configuration → Get Connection Organizations
- A UI page that allows for updating of the organizations associated with a connection
- Configuration → Configuration Computer Name Field Precedence
- A UI page to aid with setting the precedence list of values to use for the
namefield on imported computer CIs
- A UI page to aid with setting the precedence list of values to use for the
- Configuration → Properties
- A filtered view of the
sys_propertiestable displaying System Properties included with the application
- A filtered view of the
Setup
Setup is the guided setup module for the application. Review the Setup section of this documentation for more information.
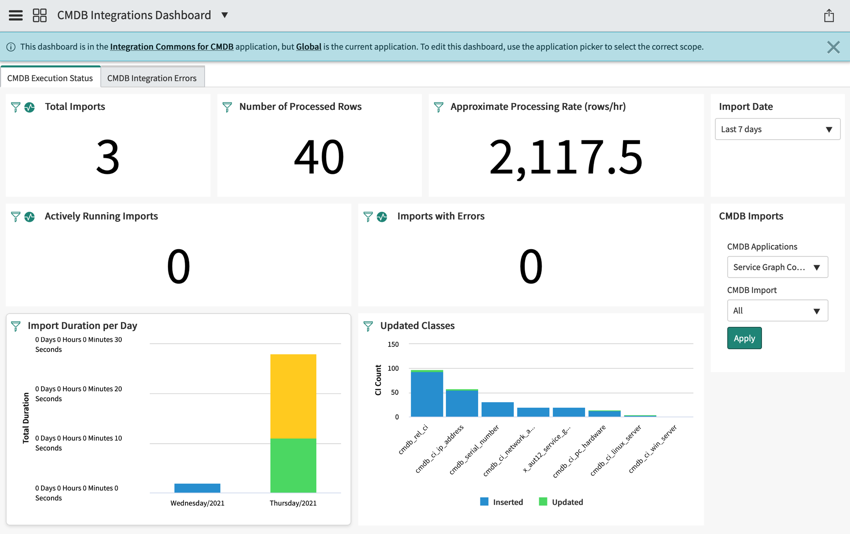
Integration Dashboard
The Integration Dashboard links to the CMDB Integration Dashboard included with the Integration Commons for CMDB application on which the Service Graph Connector for Automox depends. If you have other Service Graph Connectors installed, this module links to the same dashboard as those.
Data Sources
This module is a list view of data sources (sys_data_source) included with the application. Each data source is responsible for performing a specific data import for the application. Included data sources:
- SG-Automox Devices
- Imports Automox device details and patching metrics into the CMDB
Import Schedules
A list view of the Import Schedules (scheduled_data_import) associated with the included data sources, including the default import schedule for reference and copying. Import schedules:
- SG-Automox - Default
- Executes the SG-Automox Devices data source
- Future releases of the application may add data sources. In that event, this default import schedule may receive updates to execute all included data sources sequentially.
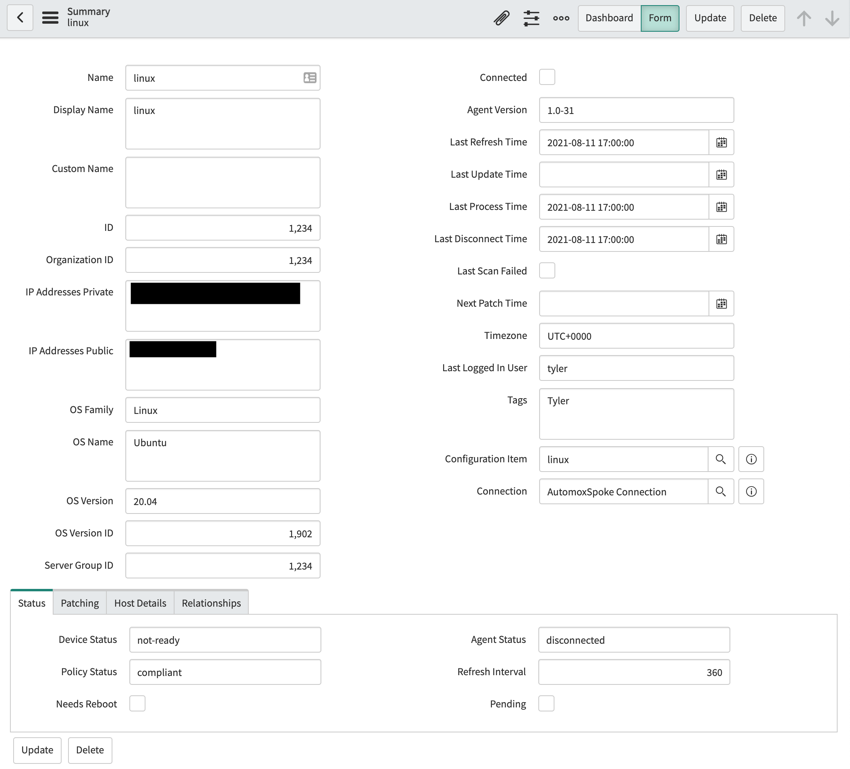
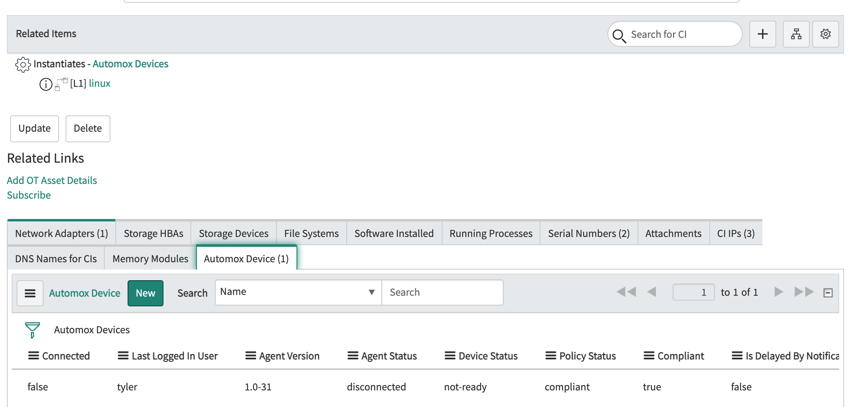
Automox Devices
This module is a list view of all Automox devices imported by the SG-Automox Devices data source. The default form includes sections that separate summary details for the device from more specific host and patching-related information. Relationships to cmdb_ci_hardware derived CIs are displayed. Finally, the Connection field references the Connection record used to import the device.
To view the data in this table, a user must have the x_aut12_service_gr.automox_device_user role assigned.
Support
The Support module provides a link to the Automox Support website.
Configuration
The configuration section of the application menu includes modules for the configurable components of the application. These are configurable using the Setup module.
Connections
A list view of the HTTP(S) Connections (http_connection) that are configured to use the included x_aut12_service_gr.SG_Automox_Conn_Cred_Alias Connection and Credential Alias. Multiple connections are supported. When multiple active connections exist, the data source will perform an import for each. The data source ignores inactive records.
To save steps when setting up a new connection, use the Create New Connection & Credential related link. The link is available through the Configure the API Key step in the Guided Setup or you can search for Connection & Credential Aliases in the filter navigator and click SG-Automox_Conn_Cred_Alias.
Get Connection Organizations
A UI page that allows for configuration of the Automox organizations that are associated with a connection. Connections do not require organization associations; however, accounts with more than one organization do require that organizations be set to import devices from multiple organizations. Connections without the Organization IDs field set only import defaults from the default organization for the API key of the connection.
The page also provides connection validation. For instance, if the Automox API Key set for the connection is not valid, an error message will be displayed. Valid connections will return a list of organizations from which to select. The organization list retrieval process retains prior organization selections.
To use the page, first select a connection via the reference selector. The application will then attempt to retrieve the list of organizations for the connection. The form displays any error messages received during the organization retrieval process.
Each data source loops through the organizations associated with a connection, running import for the data in each organization.
Configure Computer Name Field Precedence
This is a UI page that assists with configuration of the x_aut12_service_gr.computer_name_precedence System Property. The current value for the property is loaded into the selection bucket on the right side and available, but unselected options are shown on the left. Moving a value from left to right will add it to the list. The order of precedence is from top to bottom. Use the up and down arrow buttons to change the order of the selected fields.
Click the Update Precedence button to update the value of the System Property. Future imports use this new precedence.
Properties
A filtered view of the sys_properties table displaying a list of the System Properties included with the application. The list of included System Properties is:
x_aut12_service_gr.computer_name_precedence: a | delimited list of fields to select from when setting the name value for a CI to import. If this property contains an invalid value,nameis the default value. These values are supported:fqdn: the first discovered fully qualified domain name for the computercustom_name: the custom name set for the computer in Automoxname: the hostname of the computer
x_aut_12_service_gr.automox_support_url: the link to the Automox Support site used within the UI pages and scripts included with the applicationx_aut_12_service_gr.automox_status_url: the link to the Automox Status page used within the UI pages and scripts included with the application
Importing Automox Devices
You are ready to import Automox devices after finishing the Setup. For scheduled import, we recommend importing on a daily schedule. For testing after installation, you can manually execute the import schedule created or updated during the guided setup.
Execute the Schedule
To import Automox devices, navigate to a schedule configured for the SG-Automox Devices data source. The Import Schedules module provides a list of all import schedules associated with the included data sources. On the import schedule form, click the Execute Now button. This action creates a new import set, runs the ETL transformations on the imported data, and inserts the transformed records into the CMDB. The Identification and Reconciliation Engine (IRE) handles identification of existing records during the import process, updating records that matching the import set data if found.
CMDB Lookups
The Robust Import Set Transformers (RTE) for SG-Automox Devices data source includes multiple lookup criteria passed to the Identification and Reconciliation Engine (IRE). These lookups determine whether the data associated with a particular Automox device is new to the CMDB or whether it corresponds with an existing record.
The default CMDB mappings use the following lookups:
Hardware
- Fields:
- Name
- Use:
- All
cmdb_ci_hardwarederived class (computers) - The first FQDN for the device is used if it was discovered by the Automox agent. Otherwise the hostname for the device is used.
- All
Network Adapter
- Fields:
- MAC Address
- Name
- Name is set to the device name of the network adapter, e.g
Ethernet 1oren0
- Name is set to the device name of the network adapter, e.g
- Use:
- All
cmdb_ci_hardwarederived classes (computers)
- All
Serial Number
- Fields:
- Serial Number
- Serial Number Type
- Use:
- All
cmdb_ci_hardwarederived classes (computers)
- All
IP Address
- Fields:
- Name
- Type
Automox Device
- Fields:
- ID
- Organization ID
- Use:
- Automox Device class
Reviewing Results
Integration Dashboard
The primary way to review results of Automox device imports is via the included Integration Dashboard module. For more details on this dashboard, review ServiceNow's documentation for the dashboard:
The dashboard provides high-level statistics on CMDB integration executions across your entire ServiceNow instance. To filter by the Service Graph Connector for Automox, select it from the CMDB Applications filter on the right side of the dashboard. You can view import performance, CI classes updated, errors that occurred during import executions, and more.
Click any of the statistics on the dashboard to navigate to the source table for the data, allowing you to learn more about the specifics of a particular import.
Computers Table
To view computers that have been created or updated by the Service Graph Connector for Automox, you can filter the list view of the Computers (cmdb_ci_computers) table by the SG-Automox Discovery Source.
- Navigate to the Computers table list view by typing
cmdb_ci_computers.listinto the filter navigator and pressing enter.- You can also search for Computers and select the Configuration > Base Items > Computers module.
- Click the filter icon
- Configure the filter as follows:
- Field:
Discovery Source - Condition:
is - Value:
SG-Automox
- Field:
- Click
Run
The filter updates the list to only display devices that have a discovery source of SG-Automox. The application installation process creates this discovery source using a Fix Script.
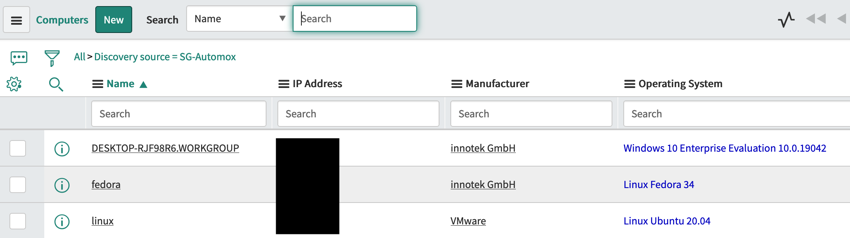
Click on a record to display the details for the computer, including the CIs related to the computer, such as the Network Adapter, IP Addresses, Serial Numbers, and the Automox Device.
Troubleshooting
The ServiceNow system logs are helpful in many application troubleshooting situations. To access the system logs, search for System Logs in the filter navigator and select the System Log > All module.
To filter for logs specific to the Service Graph Connector for Automox, configure a filter with the Application set to Service Graph Connector for Automox.
If you find many logs to search through, adding a filter on the log level is necessary. For example, select log messages where the log level is Warning or Error.
Installation
Most errors related to the installation of the application are due to dependencies for the application not being satisfied. If the application fails to install, the best course of action is to review the Installation documentation section. Additionally, investigate the ServiceNow system logs for errors around the time of application installation.
Configuration
Errors related to the configuration of the application are described in in this section.
Connections
Invalid Automox API Key
An import will fail to run if the Automox API key is invalid. The Automox API key is invalid if you see the following error in the system log:
Error executing script : org.mozilla.javascript.JavaScriptException: received bad status code 403 Method failed: (/api/servers) with code: 403 - Forbidden username/password combo (sys_script_include.27ac118487b2b410490f52883cbb3562.script; line 104)You can verify that the Automox API key is invalid by navigating to the Service Graph Connector for Automox > Configuration > Connection Organizations module and selecting the connection in the reference field. If you receive an error message, the Automox API key for the connection needs to be updated. There are three primary reasons that the API key may not be working:
- The API key does not match a key in the Automox console.
- The API key value for the connection was modified by a user with access to the
http_connectiontable. - The API key expired.
Navigate to the following page in the Automox console to copy your API key details or create a new one if the key has expired:
MID Server Offline
If the connection uses a ServiceNow MID Server, but the MID server is not online, imports using that connection will fail to execute. Review the MID Server > Servers module to troubleshoot the status of the MID server that is unavailable or in an error state.
CMDB Mappings
Automox recommends using the default CMDB mappings. If you would like to provide a recommendation for changes to the mappings, contact support. Alternatively, you can change the included mappings by following the steps in the Configure the CMDB Mappings section of this documentation.
Running
Errors related to running the application are described in this section.
Import Schedules Will Not Run
The default import schedule (and copies of it) include a pre-check condition that prevents execution of an import if there is an active import running by reviewing the status of the most recent execution. An error message similar to the following indicates that the pre-check condition is blocking the execution of the import:
Most recent SG-Automox execution [CEX0001020] is not complete [transforming], cancelling current scheduled execution. To review all executions, see the 'sn_cmdb_int_util_cmdb_integration_execution' tableTo review the status of the running execution:
- Navigate to the Service Graph Connector for Automox > Integration Dashboard module
- Filter by the Service Graph Connector for Automox CMDB Application
- Click the number value for Total Imports.
- This will navigate you to the list view for the CMDB Integration Execution (
sn_cmdb_int_util_cmdb_integration_execution) table.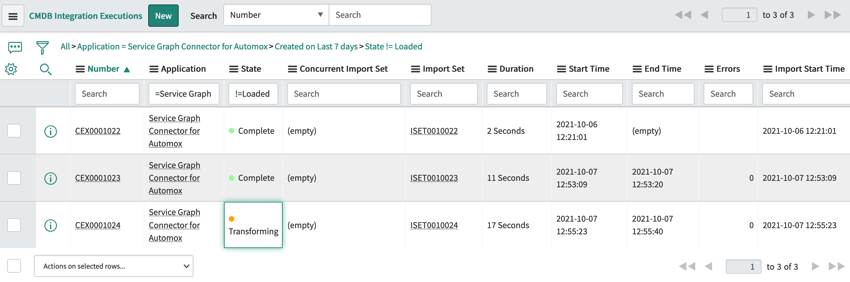
- This will navigate you to the list view for the CMDB Integration Execution (
- Click on the most recent record in the list to review the execution details.
If the execution does not appear to be running, but the state is still transforming, manually change the state to complete to allow the import schedule pre-check condition to pass, allowing new imports to run. The form for the individual execution record does not allow for updates. However, updates to the state of an execution record are possible by clicking the state field on the CMDB Integration Execution list view.
Import
Multiple Automox Device Associations for a Single CI
A single CI can have multiple Automox Devices associated with it. The most common reason for this is that Automox has more than one device with the same name. To resolve this issue, update the device name(s) to fix the name collision. Subsequent imports should associate the device with a new or existing CI with the new name.
