Automox Agent Deployer
The Automox Agent Deployer![]() Tool for deploying agents to CrowdStrike-managed devices. is a locally downloaded and executed client binary that allows you to deploy Automox agents
Tool for deploying agents to CrowdStrike-managed devices. is a locally downloaded and executed client binary that allows you to deploy Automox agents![]() Lightweight client application, which is installed on managed devices. to CrowdStrike managed device
Lightweight client application, which is installed on managed devices. to CrowdStrike managed device![]() A subset of Assets, a general term denoting anything that runs the Automox Agent and is registered with the system. estate using the CrowdStrike API
A subset of Assets, a general term denoting anything that runs the Automox Agent and is registered with the system. estate using the CrowdStrike API![]() A method for programmatic platform access. for the Real-Time-Response module. After configuring variables using a CLI-based GUI for ease of use, the client installs the Automox agent on devices scoped in the configurator step.
A method for programmatic platform access. for the Real-Time-Response module. After configuring variables using a CLI-based GUI for ease of use, the client installs the Automox agent on devices scoped in the configurator step.
Configuring and setting up scripts
This consists of 5 steps. The following sections describe them.
Step 1: Download the deployer application
|
OS - Architecture |
File |
|---|---|
|
Linux - arm64 |
|
|
Linux - amd64 |
|
|
macOS - arm64 |
|
|
macOS - amd64 |
|
|
Windows - arm64 |
|
|
Windows - amd64 |
- For Windows, open up a PowerShell window and call the .exe file directly.
- For Linux or macOS, open a terminal window in the directory where you have downloaded the file, and run
chmod a+x <filename>, replacing<filename>with the name of the downloaded file. You can then execute the file by running./<filename>.
Step 2: Configurator (for first-time use)
After you download and install the Agent Deployer application, select command-config. Now you can set up the configuration including the file path, Automox access key![]() The key that is used during agent installation to connect devices to a particular organization., CrowdStrike Client ID, CrowdStrike secret, the CrowdStrike API region, and the platform deployment size. All of these elements are required.
The key that is used during agent installation to connect devices to a particular organization., CrowdStrike Client ID, CrowdStrike secret, the CrowdStrike API region, and the platform deployment size. All of these elements are required.
Requirements
- Automox Access Key
- CrowdStrike API Client ID
- CrowdStrike API Client Secret
- CrowdStrike API Region
- To identify the API key
 Credential for programmatic access to the Automox platform. region, refer to the Cloud environment column in the overview table of your CrowdStrike API reference article, which is accessible from here: https://falcon.crowdstrike.com/documentation/46/crowdstrike-oauth2-based-apis.
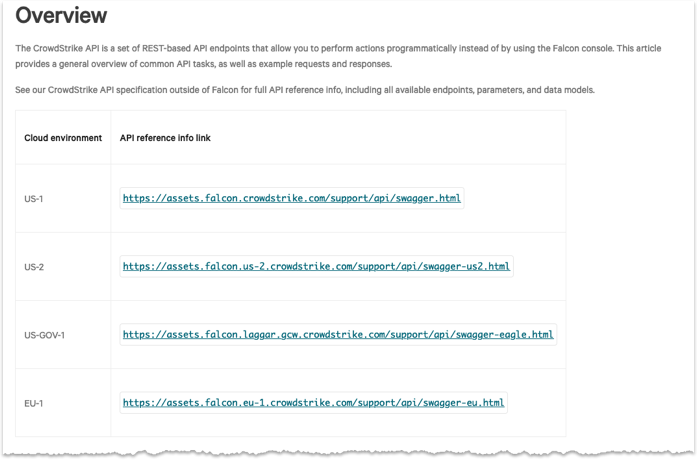
- To identify the API key
- CrowdStrike API Client Permissions Actions associated with a default or custom roles.
- Hosts - read
- For getting details on hosts being deployed to
- Host Groups - read
- For getting available groups and membership details
- Real time response - read and write
- For executing the RTR installation scripts. The write permission here allows custom scripts to run.
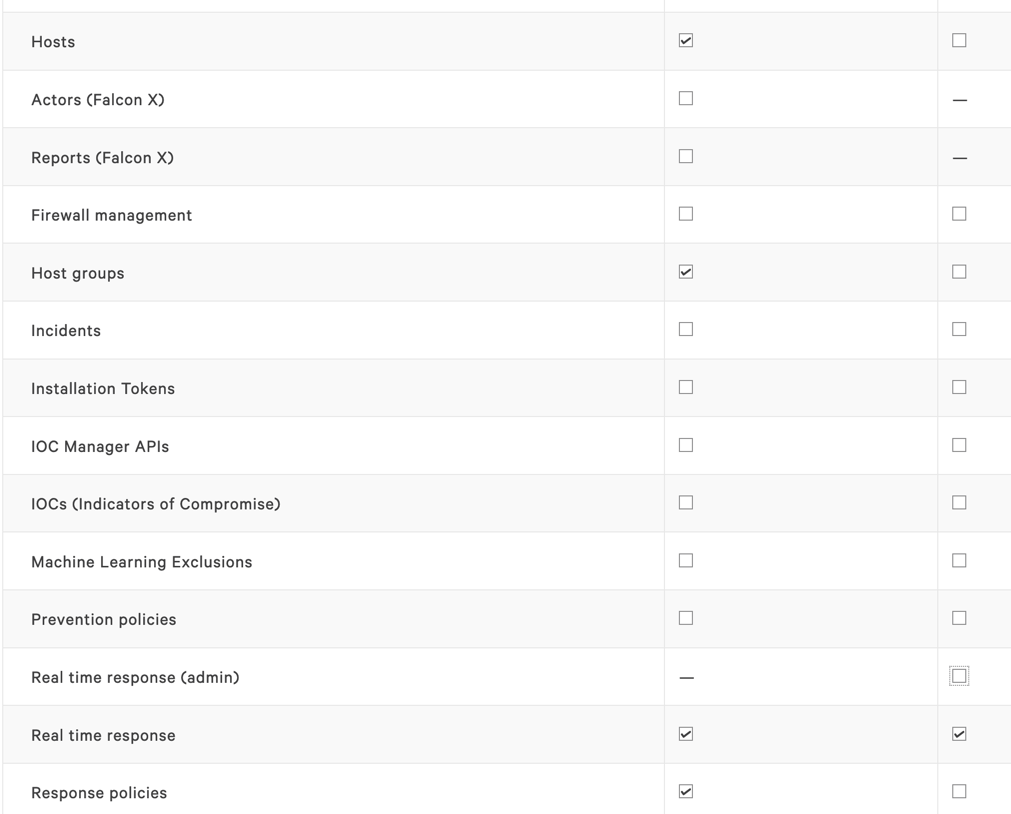
- Response policies
- For verifying that the selected groups have Real time response capabilities enabled
- Group Response Policy Configuration
- All groups selected for deployment must have the following Real Time Response Policy settings enabled
- Real Time Response - enabled
- Custom scripts - enabled
- Falcon scripts - enabled

- All groups selected for deployment must have the following Real Time Response Policy settings enabled
After you configure the Automox key and CrowdStrike configuration values, the deployer uses those details to connect to the CrowdStrike API to get a list of available groups![]() Represents a concrete grouping of devices. Every device must be assigned to a single group. A group contains settings for the following:
- refresh interval
- OS auto-update and provide them for picking where to deploy. Multiple groups can be selected.
Represents a concrete grouping of devices. Every device must be assigned to a single group. A group contains settings for the following:
- refresh interval
- OS auto-update and provide them for picking where to deploy. Multiple groups can be selected.
Step 3: Select upload or print custom scripts
The configurator provides an option to upload or print the RTR scripts necessary for deployment of the Automox agent.
The upload route is the easiest and most likely to ensure success when deploying as there is no risk of errors related to formatting/new lines from copying and pasting the printed scripts.
Upload Scripts

- Before you continue, confirm that the Real time response (admin) - write permission is enabled for the CrowdStrike API Client being used by the deployer. If it is not configured when attempting to upload, 2 retries are allowed before the configurator exits.

- The deployer then attempts to upload the installation script for each platform.
- The scripts are uploaded with permissions that allow them to be used by any user with the RTR Active Responder role or API Client with the Real time response - write permission (non-admin).
- If successful, the configurator continues. Ensure that the Real time response (admin) - write permission is removed at this point. It is not needed for normal operation of the deployer and provides too much permission.
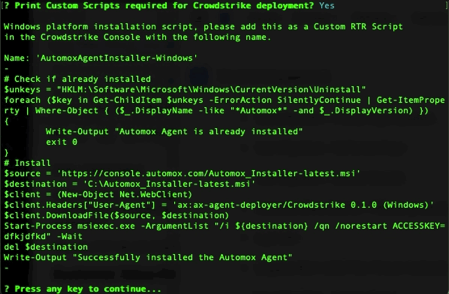
Print Scripts
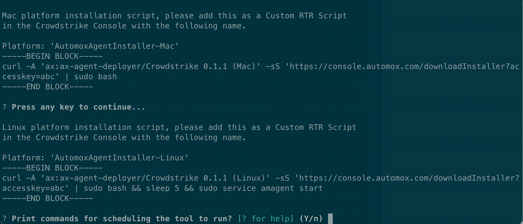
- When selecting print, the script for each platform is printed for copying and pasting into the CrowdStrike console under Response Scripts & Files. The names of the scripts need to make those provided by the deployer.
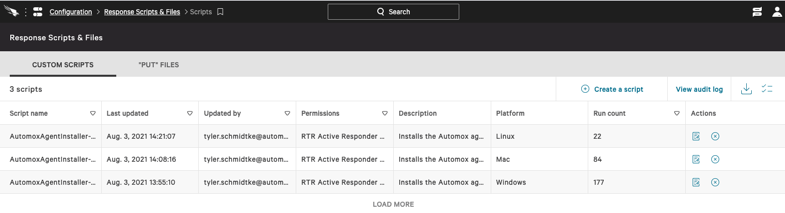
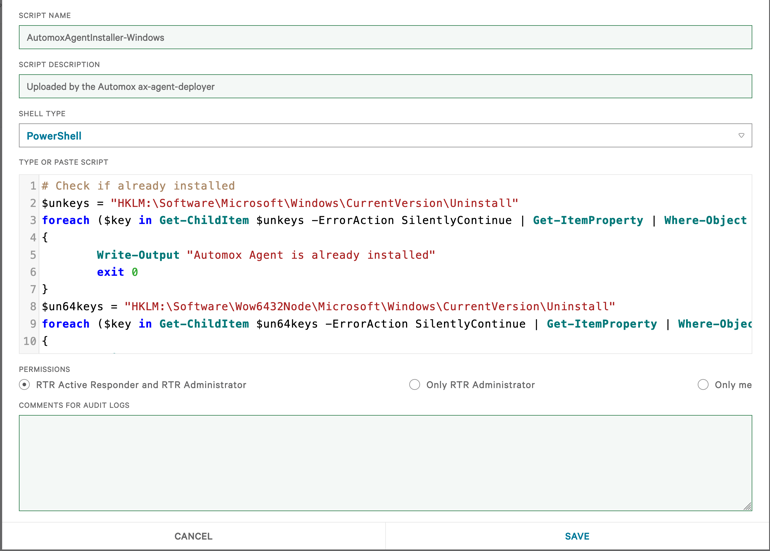
- Navigate to Response Scripts & Files and click Create a script.
- Enter the name and description and ensure the correct shell type is selected for each OS. Be aware that Real Time Responder roles are required for this action. These can be added via User Management in the CrowdStrike console.
- OS Shell Types
- Windows: PowerShell
- Linux: Bash
- macOS: Zsh
- Permissions: RTR Active Response and RTR Administrator
- This permission allows the deployer to use this script without admin permissions.
- This permission allows the deployer to use this script without admin permissions.
- OS Shell Types
Repeat the steps for macOS and Linux by pressing any key twice and using the name and script content printed for each.
Step 4: Set up recurring schedule to run the scripts
- For the prompt: “Print commands for scheduling the tool to run”, enter Yes.
- Provide path - defaults to the existing path and determine the frequency. This is only available for Linux and Windows.
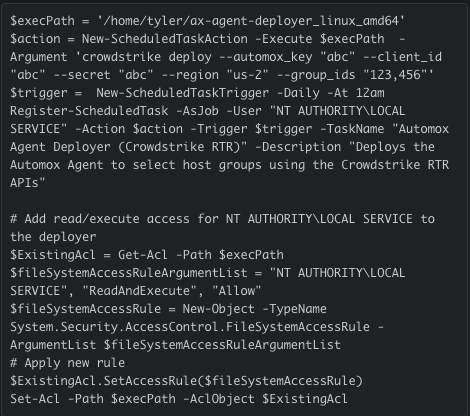
Scheduler Example - Windows
The application prints the PowerShell script for scheduling when you select Windows as the scheduling platform.
- Open PowerShell and run printed script.
Review Task Scheduler

After you run the recurring schedule script, a new automated task appears in the Task Scheduler. All arguments are pre-populated with necessary flags. You can change any parameters within the Task Scheduler.
Step 5: Save configuration and pre-check
You can opt to save the configuration to a file. You can reference this file using the --config flag when running the deployer. A configuration file is not required if using the schedule task/cron schedulers as the commands are generated with the configuration values as flags
Finally, the deployer attempts to validate that the selected groups for deployment have Real time response capabilities enabled. Any groups with incorrect settings will be logged.
Deployment
Select command-deploy to see results of your actions.

Deploy command and results. For devices that are not online, the commands are queued up via the queue offline flag within CrowdStrike.
Troubleshooting
Look out for a few known errors when deploying.
Missing scripts
RTR Custom Script 'AutomoxAgentInstaller-<Platform>' is missing, cannot deploy.
Please run configuration to upload or print the required script"
This error message appears when the specified RTR Custom Script is not found in the CrowdStrike platform. A couple of reasons are possible:
- The scripts were not created.
- In this case, run the
configcommand to upload or print the scripts.
- In this case, run the
- The permissions are not correct on the script.
- Set the script permissions to the RTR Active Responder and Admin

- Set the script permissions to the RTR Active Responder and Admin
Offline Hosts
host 'abc-123' (device-id) was offline, deployment will be performed
by Crowdstrike when the device is online
This message is not necessarily an error. It appears when a host in the deployment group was offline. CrowdStrike attempts to run the command when the host is online; however, the deployer does not track these queued commands.
Invalid scripts
RTR Custom Script 'AutomoxAgentInstaller-<Platform>' returned an error during deploy.
This is usually due to the script being improperly formatted or invalid.
Please run configuration to upload or print the required script to fix.
If manually uploading, refer to the README for troubleshooting steps.
If the scripts were manually uploaded to the CrowdStrike platform, they might not have been pasted correctly.
The most common reason for this is trailing empty lines at the end of a script. Remove these and try again. If this doesn’t fix the issue or if there are no empty lines, try uploading the scripts via the deployer.

Timeout
If the command takes longer than 30 seconds to complete, an error appears stating that the command timed out. This could be due to a slow connection or some other error for the host. One thing to try is rebooting the host that failed to install (if that’s an option).
Other deployment errors
The deployment might capture other errors. Unknown errors return the raw details from the deploy operation. These are usually helpful in understanding what went wrong.
