Deploying Automox via VMware Workspace ONE
This document describes how to deploy the Automox agent![]() Lightweight client application, which is installed on managed devices. through VMware Workspace ONE. The recommended deployment of the Automox agent consists of following 3 configurations.
Lightweight client application, which is installed on managed devices. through VMware Workspace ONE. The recommended deployment of the Automox agent consists of following 3 configurations.
Create or Modify Existing Notification Profile
Notification![]() Configurable end user messaging sent by AXP. configuration profiles are supported by macOS, which ensures delivery of Automox notifications.
Configurable end user messaging sent by AXP. configuration profiles are supported by macOS, which ensures delivery of Automox notifications.
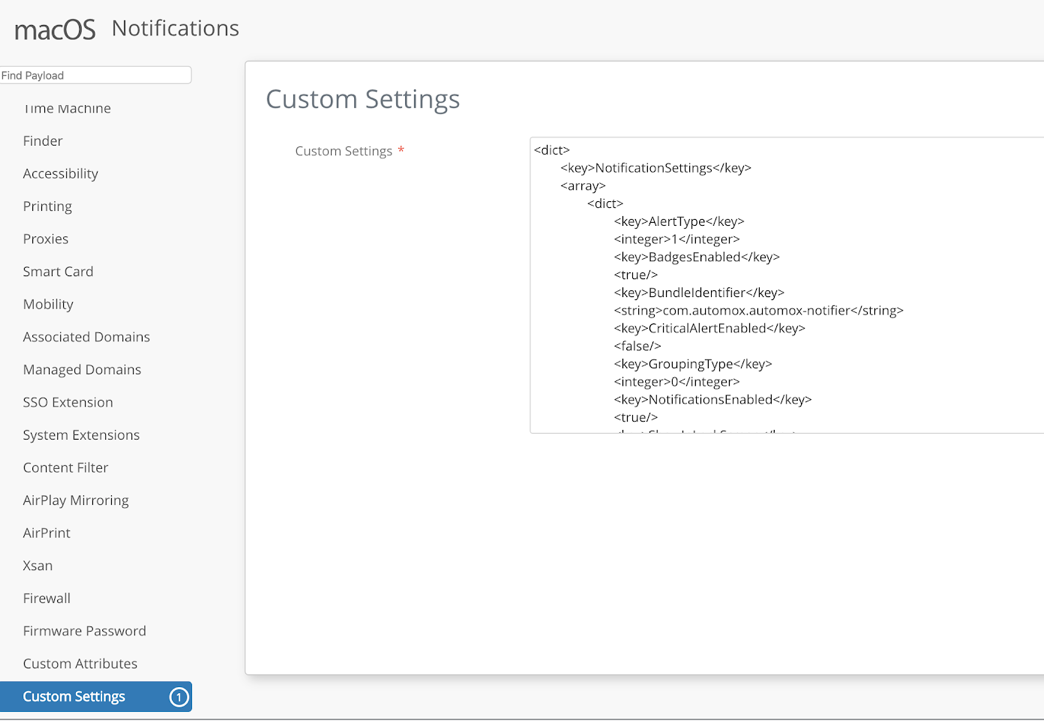
If no notification payload currently exists, create a new profile with Custom Settings using the following content to allow all Automox and Microsoft Office notification to run:
<dict>

    <key>NotificationSettings</key>

    <array>

        <dict>

            <key>AlertType</key>

            <integer>2</integer>

            <key>BadgesEnabled</key>

            <true/>

            <key>BundleIdentifier</key>

            <string>com.automox.automox-notifier</string>

            <key>CriticalAlertEnabled</key>

            <false/>

            <key>GroupingType</key>

            <integer>0</integer>

            <key>NotificationsEnabled</key>

            <true/>

            <key>ShowInLockScreen</key>

            <true/>

            <key>ShowInNotificationCenter</key>

            <true/>

            <key>SoundsEnabled</key>

            <true/>

        </dict>

        <dict>

            <key>AlertType</key>

            <integer>1</integer>

            <key>BadgesEnabled</key>

            <true/>

            <key>BundleIdentifier</key>

            <string>com.microsoft.Word</string>

            <key>CriticalAlertEnabled</key>

            <false/>

            <key>GroupingType</key>

            <integer>0</integer>

            <key>NotificationsEnabled</key>

            <true/>

            <key>ShowInLockScreen</key>

            <true/>

            <key>ShowInNotificationCenter</key>

            <true/>

            <key>SoundsEnabled</key>

            <true/>

        </dict>

        <dict>

            <key>AlertType</key>

            <integer>1</integer>

            <key>BadgesEnabled</key>

            <true/>

            <key>BundleIdentifier</key>

            <string>com.microsoft.Excel</string>

            <key>CriticalAlertEnabled</key>

            <false/>

            <key>GroupingType</key>

            <integer>0</integer>

            <key>NotificationsEnabled</key>

            <true/>

            <key>ShowInLockScreen</key>

            <true/>

            <key>ShowInNotificationCenter</key>

            <true/>

            <key>SoundsEnabled</key>

            <true/>

        </dict>

        <dict>

            <key>AlertType</key>

            <integer>1</integer>

            <key>BadgesEnabled</key>

            <true/>

            <key>BundleIdentifier</key>

            <string>com.microsoft.Powerpoint</string>

            <key>CriticalAlertEnabled</key>

            <false/>

            <key>GroupingType</key>

            <integer>0</integer>

            <key>NotificationsEnabled</key>

            <true/>

            <key>ShowInLockScreen</key>

            <true/>

            <key>ShowInNotificationCenter</key>

            <true/>

            <key>SoundsEnabled</key>

            <true/>

        </dict>

        <dict>

            <key>AlertType</key>

            <integer>1</integer>

            <key>BadgesEnabled</key>

            <true/>

            <key>BundleIdentifier</key>

            <string>com.microsoft.Outlook</string>

            <key>CriticalAlertEnabled</key>

            <false/>

            <key>GroupingType</key>

            <integer>0</integer>

            <key>NotificationsEnabled</key>

            <true/>

            <key>ShowInLockScreen</key>

            <true/>

            <key>ShowInNotificationCenter</key>

            <true/>

            <key>SoundsEnabled</key>

            <true/>

        </dict>

        <dict>

            <key>AlertType</key>

            <integer>1</integer>

            <key>BadgesEnabled</key>

            <true/>

            <key>BundleIdentifier</key>

            <string>com.microsoft.onenote.mac</string>

            <key>CriticalAlertEnabled</key>

            <false/>

            <key>GroupingType</key>

            <integer>0</integer>

            <key>NotificationsEnabled</key>

            <true/>

            <key>ShowInLockScreen</key>

            <true/>

            <key>ShowInNotificationCenter</key>

            <true/>

            <key>SoundsEnabled</key>

            <true/>

        </dict>

        <dict>

            <key>AlertType</key>

            <integer>1</integer>

            <key>BadgesEnabled</key>

            <true/>

            <key>BundleIdentifier</key>

            <string>com.microsoft.OneDrive</string>

            <key>CriticalAlertEnabled</key>

            <false/>

            <key>GroupingType</key>

            <integer>0</integer>

            <key>NotificationsEnabled</key>

            <true/>

            <key>ShowInLockScreen</key>

            <true/>

            <key>ShowInNotificationCenter</key>

            <true/>

            <key>SoundsEnabled</key>

            <true/>

        </dict>

        <dict>

            <key>AlertType</key>

            <integer>1</integer>

            <key>BadgesEnabled</key>

            <true/>

            <key>BundleIdentifier</key>

            <string>com.microsoft.OneDrive-mac</string>

            <key>CriticalAlertEnabled</key>

            <false/>

            <key>GroupingType</key>

            <integer>0</integer>

            <key>NotificationsEnabled</key>

            <true/>

            <key>ShowInLockScreen</key>

            <true/>

            <key>ShowInNotificationCenter</key>

            <true/>

            <key>SoundsEnabled</key>

            <true/>

        </dict>

        <dict>

            <key>AlertType</key>

            <integer>1</integer>

            <key>BadgesEnabled</key>

            <true/>

            <key>BundleIdentifier</key>

            <string>com.microsoft.autoupdate.fba</string>

            <key>CriticalAlertEnabled</key>

            <true/>

            <key>GroupingType</key>

            <integer>0</integer>

            <key>NotificationsEnabled</key>

            <true/>

            <key>ShowInLockScreen</key>

            <true/>

            <key>ShowInNotificationCenter</key>

            <true/>

            <key>SoundsEnabled</key>

            <true/>

        </dict>

    </array>

    <key>PayloadDescription</key>

    <string>Configures notifications</string>

    <key>PayloadDisplayName</key>

    <string>Configures notifications</string>

    <key>PayloadIdentifier</key>

    <string>com.apple.notificationsettings.AE35A3DC-56BC-48EB-8C4D-F4C5AE4D1C5C</string>

    <key>PayloadType</key>

    <string>com.apple.notificationsettings</string>

    <key>PayloadUUID</key>

    <string>AE35A3DC-56BC-48EB-8C4D-F4C5AE4D1C5C</string>

    <key>PayloadVersion</key>

    <integer>1</integer>

</dict>
If you have an existing Notifications profile (macOS only supports a single notifications profiles), add the previous content in your existing NotificationSettings array.
Create an Automox Privacy Preferences Profile
Automox leverages the Microsoft AutoUpdate Tool to handle Microsoft Office updates. To ensure the Automox agent is also granted access to this, you must create a Privacy Preferences Profile.
- Devices → Profiles and Resources → Profiles
- Add Profile
- Apple macOS
- Device Profile
- Select Privacy Preferences
- Add App
Identifier: /usr/local/bin/amagent
Identifier Type: Path
Code Requirement: identifier "com.automox.agent" and anchor apple generic and certificate 1[field.1.2.840.113635.100.6.2.6] /* exists */ and certificate leaf[field.1.2.840.113635.100.6.1.13] /* exists */ and certificate leaf[subject.OU] = DAEQ58A4ES
Static Code Validation: Off
Apple Events: Allow
Receiver Identifier: com.microsoft.autoupdate2
Receiver Identifier Type: Bundle ID
Receiver Code Requirement: identifier "com.microsoft.autoupdate2" and anchor apple generic and certificate 1[field.1.2.840.113635.100.6.2.6] /* exists */ and certificate leaf[field.1.2.840.113635.100.6.1.13] /* exists */ and certificate leaf[subject.OU] = UBF8T346G9
Deploy the Automox Agent as a Native Application
- Install the VMware Workspace ONE Admin Assistant https://docs.vmware.com/en/VMware-Workspace-ONE-UEM/1904/Software_Distribution/GUID-AWT-ADMINASSIST.html
- Download the latest Automox Agent
- Pull the Automox Agent pkg file into the Admin Assistant
- Open the generated plist file

- Find the
display_nameandnamekeys and remove the trailing version characters (they should simply readAutomoxAgent).
(Workspace ONE does not support dashes in display names)
Before:
After: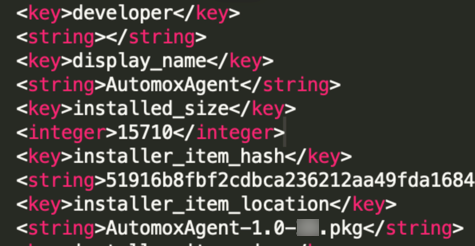
- It is also recommended that the
versionkeys are also modified to remove the “-” and just have “.” (example: 1.0.41). This will allow the version information to properly display in Workspace ONE.
Note: Do not modify theinstaller_item_locationvalue as that points to the installer pkg file. - Save file.
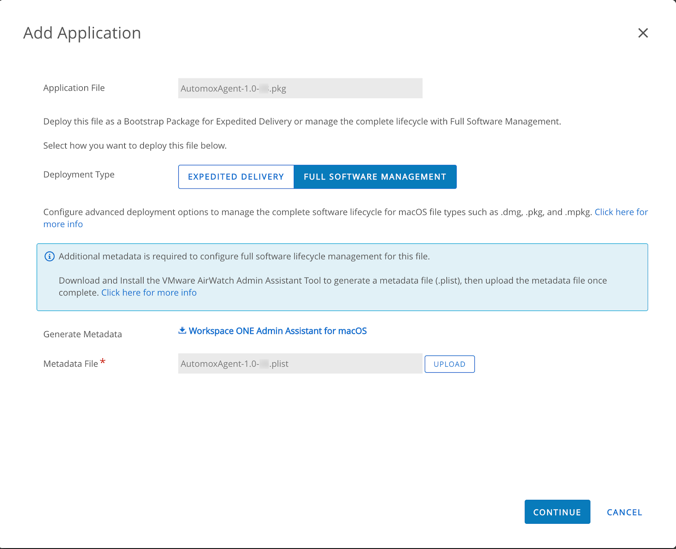
- Add a Native Application to Workspace ONE.
- Upload the Automox pkg installer file.
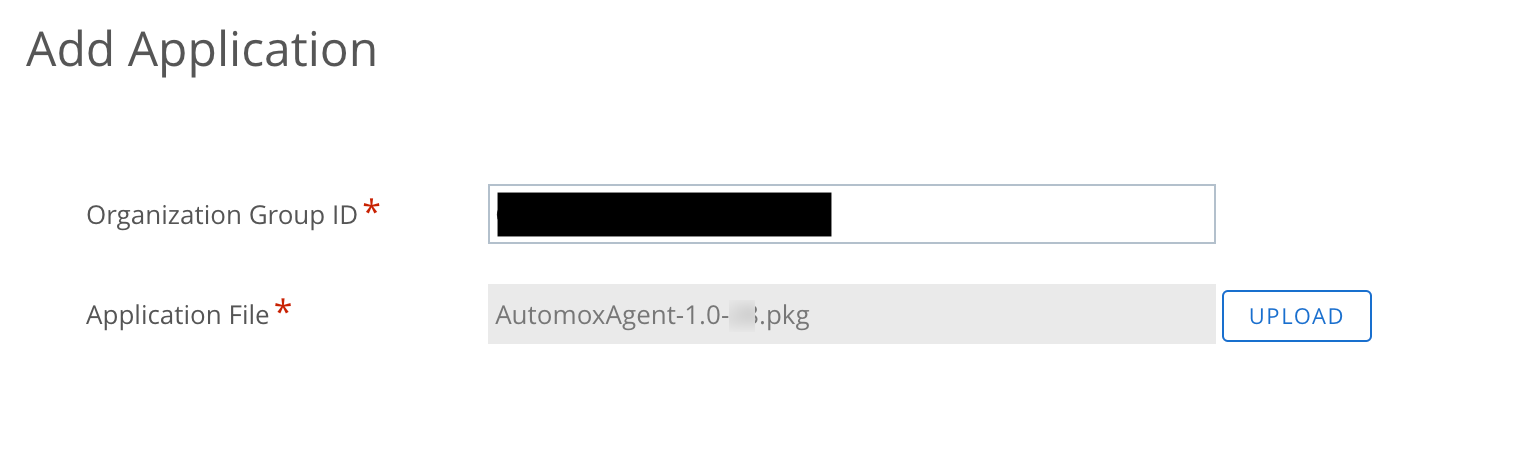
- Upload the plist as the "Metadata File"
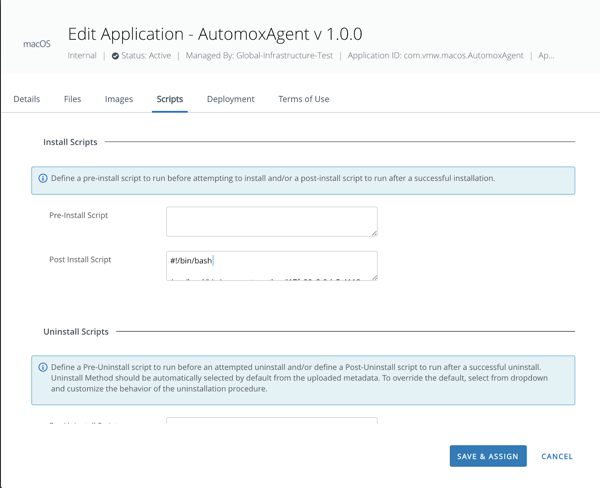
- For automated installations, add the following code to the "Post Install Script"Copy
#!/bin/bash
/usr/local/bin/amagent --setkey "ENTER_AUTOMOX_ACCESS_KEY_HERE"
/usr/local/bin/amagent --setgrp "Default Group/ENTER_GROUP_NAME_HERE"
sudo launchctl bootout system/com.automox.agent
sudo launchctl bootstrap system /Library/LaunchDaemons/com.automox.agent.plist